Friday 30 July 2010

Blackberry Cinnamon Tray Bake Cake


This is a adapted recipe from an old Good Food magazine. The original recipe used cherries and I also found the mix quantities were a bit out.

There have been so many cherry cakes of various descriptions on food blogs of late, that I decided to avoid joining the masses and used some blackberries instead.

BIG. FAT. JUICY. BLACKBERRIES. It's a sign that the seasons are starting to change and summer is passing it's peak. Autumnal fruits are already starting to arrive.


This recipe fits in an 8" square silicone bakeware mould or cake tin. If using silicone, do grease the base with this cake. If using a non stick tin, grease and line or grease and flour it. It's a really simple and easy recipe.

Recipe

140g self raising flour
1/2 tsp ground cinnamon
pinch of nutmeg
50g caster sugar
1 egg
5 tbsp of milk
85g melted butter
350g blackberries

Topping

35g plain flour
25g  caster sugar
25g butter

Grease mould or grease and line tin.

Sift cake dry ingredients together. Beat in melted butter and egg until a smooth batter forms.

Spread batter out into bottom of a prepared 8"square cake mould or tin. I'm sure round would work just as well too. Be prepared - this is a tiny volume of mix and it simply doesn't look right !

Put the blackberries on top of the cake batter. There is a lot of fruit and the top of the mix will be almost all covered.


Now rub the chilled butter, sugar and flour together for the topping. It needs to come together to form pea / bead sized blobs. Scatter over the blackberries. Again - it's a tiny amount.


Bake at 180deg C / 160 deg fan for approx 25mins until skewer comes out clean.


Leave to cool in the tin or mould for a while until just warm before turning out. I use two trays and sandwich the mould inbetween. The cake can be then be inverted again on to a rack or plate.


The fruit makes this quite a sharp cake. It is not overly sweet. Lovely on it's own with icing sugar or served warm with ice cream.

Tuesday 27 July 2010

Canele / Canneles - French Pastries - What's the big deal ?


That's the question I've been asking myself for far too long. We've been producing an 18 cell mini canele / cannele silicone bakeware mould for a couple of years now and it's proved really popular. I'll be totally honest - when we first introduced it, I didn't KNOW what the darn thing was for.... but it did produce some pretty cute chocolates.

I got an email from someone - I don't know who - I think it was an American lady named Yvonne (or Anne ? - please excuse me that's the two names stuck in my head !).... who kindly informed me of Caneles and the traditions of making them in classic copper molds.

There are various spellings that are used for this relatively unknown French pastry. Canele, cannele appear to be the most popular.

Wikipedia says : "A canelé is a small French pastry with a soft and tender custard center and a dark, thick caramelized crust. The dessert, which is in the shape of small, striated cylinder approximately two inches in height, is a specialty of the Bordeaux region of France but can often be found in Parisian patisseries as well. Made from egg, sugar, milk and flour flavored with rum and vanilla, the custard batter is baked in a mold, giving the canelé a caramelized crust and custard-like inside."


Due to massive customer request, we decided to put a larger canele / cannele mould into production. The 8 large canele silicone bakeware mould is a brand new addition to our range. It's been sitting on my kitchen table for about 2 weeks now - BEGGING me to make caneles - the thought of which I found rather daunting.

There are loads of sites telling you that to make decent caneles you need to use copper molds and coat them inside with a white oil made with beeswax. You also need to make the batter at least a day before hand as it needs to sit in the fridge for 24 hours before you bake your delights.

On top of that - there is a high cooking temperature. These little cakes cook at higher temperatures than I've ever heard cakes being cooked at before. The high temperatures ensure a dark crispy and chewy crust which SHOULD enclose a moist custardy interior.


I've looked at lots of photos and read lots of websites. I've bit my nails (actually - that's a lie....) - but I did worry about it quite a bit. I really did envisage these going horribly wrong. Afterall - these are sacred of French patisseries and sit alongside macarons. I feared they'd turn out hideous and be a real devil to master.

The reality is that it really couldn't have been easier and I was in for a pleasant shock !

I eventually chose this recipe from Chocolate and Zucchini Blog which you find by following the link. Clotilde uses silicone moulds and omits the beeswax coating. She also includes a whopping amount of rum ! Actually - this makes them simply delicious and they are not at all "strong. I'm sure most of the alchohol burns off during the long cooking time and high temperatures.


You make your custard base the day before you want to cook it - and although it sounds hard to mess up - it was a very easy process. The milk and vanilla is brought to a simmer, then the rum is added. This is then poured hot onto flour, sugar and eggs and quickly whisked together. Leave to cool and refrigerate 24 hours.

This mix filled an 8 cell cannele silicone mold and left enough to additionally fill 12 of the 18 cells in a mini canele silicone mould.


The large ones went into my fan oven at top temperature of 230deg, which was turned down after 20 mins to 200deg C for a further 35mins. The mini caneles cooked at 200deg for 30mins. Both (in my opinion) were perfectly done. There were a breeze to remove from the moulds when cooled.


I'd guess one large canele is approx the same volume as 4 small ones. The smaller ones had more crust in relation to spongy soft custard but were also delicious. Given the choice, the large version are definately my preference. Perhaps it's the fact I'd feel less guilty about eating one or two large ones than I would 4 to 8 small ones !!!???!!

I couldn't wait until these were totally cool and samples a large one luke warm straight after these photographs. After cutting it in half, it was screaming at me to eat it... so I just had to oblige.

Well - was the hype worth it ? Most definately. I've never eaten ANYTHING quite like it before and I'm sure no other cake or pastry would compare. The outside is a rich carmelised crust that is both chewy and crunchy. The inner is a spongy moist custard flavoured with rum (I used Bacardi). It's slightly sweet and surprisingly light in both weight and texture. It's far easier to make than you are likely to imagine.

You know now that you'll just HAVE to make them......

Have fun baking !

Sarah-Jane Nash, munching a canele with coffee - July 2010


Tuesday 20 July 2010

BLOG CD GIVEAWAY - Jonny Walker (totally offtopic !)


This is totally off track from my normal blog entries, but I saw this guy - Jonny Walker - busking in Norwich last Saturday. His voice is awesome. There was quite a crowd sat listening on the steps. I was itching to join them... but I had a tired toddler with me who really needed to crash.

Anyway - I was so spellbound that I bought not one but two copies of his cd from him. He seems to sing here there and everywhere in town centres. If you search YouTube for " Jonny Walker Busking" you'll find various videos - including one of him with Jamie Oliver who is banging his pot with spoons. That's the only culinary link.... and I didn't realise it existed until an hour ago.

Anyway - I've got a copy to give away to one of you guys. All you need to do is be a listed blog follower to enter and comment on this post. If you would like to - you can also tweet us (siliconemoulds) or join us on Facebook.

I'll select the winner using a random generator on 30th July. You never know - you might be lucky !


Saturday 17 July 2010

Raspberry & Lemon Friands


Friands are delicious little teacakes that originated from the French financiers.They are made mainly with ground almonds, egg whites and very little flour which makes them moist and extremelly moreish too !

I made financiers recently and was bowled over with how nice they were. Zurin from Cherry On a Cake made some too.

Friands are seriously popular in Australia and are found in cafes, beach huts and even McDonalds all over the country. They are much more popular there than muffins and cupcakes. Once you've tried these you'll want to eat the lot ....

The heady and seductive aromas of fresh summer raspberries and fresh smell of lemon filled my kitchen. Oh - if only that smell could be bottled ! These won't hang around long so neither will the smell..... :-(


Oval Friand Cake tins or pans seem to be really hard to find, which is why we've made some in flexible silicone bakeware. The cakes release beautifully with ease leaving a perfect oval form.


You don't want Friands to rise too high and the top should be domed but not cracked. There is no inclusion of any baking agents in this recipe. Friands are also very easy to make and supposedly keep and freeze very well. Needless to say, I've not tried freezing them.

With financiers, you need to cook the butter until nut brown. Australians it seems skip this step with Friands and just melt the butter..... brown it if you like !

Recipe

175g melted butter (I use salted)
210g icing sugar
60 g plain flour
120g ground almonds
5 egg whites
zest of 1/2 a lemon.
20 large, juicy raspberries


Sift icing sugar and flour. Add almonds and stir. Whip egg whites to break up until they start to foam, but well before they reach peaking. Add the eggs and mix. Quickly mix in warm / hot melted butter.

Pour into greased and floured Friand mould.  Each cell should be approx 3/4 full. This mix is enough to make 10 - so you may want to put the remaining batter into a couple of silicone baking cups or a muffin tin / mould. Top each cell with a couple of raspberries and some lemon zest.


Bake at 190deg C fan oven (210deg normal) for 15 > 20 mins until springy to the touch.

With the remaining mix, I made another couple of snowflake shaped friands but without the addition of rasperries. The doming on the top was useful for propping the friands up to show the snowflake design. I love these !


Sarah-Jane Nash - http://www.siliconemoulds.com/ July 2010

Tuesday 13 July 2010

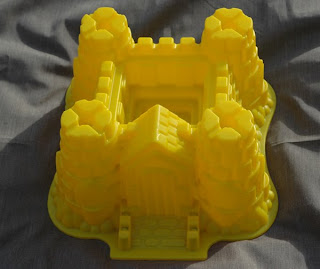
Dutch Apple CASTLE Cake !


This is a post for loads of people out there who are still waiting to see what all our new moulds are.

 I'm sorry it's taking me so long.. it's SUCH a big job at the moment as there are so many new silicone bakeware moulds and other items just in.


This CASTLE mould is an absolute cracker, and such fun too ! There are so many things you could do with it. Using a vanilla mix, the cake should retain a pale colour and look fab decorated with lots of sweets / candy - or just leave it as a plain and unadulterated cake. No sin in that.

It would look totally awesome as a chocolate cake simply dusted with icing sugar for a wintery seasonal feel.... I fancy making an icecream castle too. Or even for a giant rocky road as one of our shop customers has in mind. I'm looking forward to seeing how creative some of the purchasers are.


Anyway - for this cake, I made a Dutch Apple Bundt Cake originating from http://www.allrecipes.com/ - but tweaked it to suit. The cake mix produces a moist and dense cake. Refrigerated, it should keep well after baking. I found rises very little and one batch is no where near enough. Yup - this was my second cake of the day and the mould was still short by a couple of spoonfuls if I'm being really critical. As this cake has got so much apple in it, it also comes out quite a dark colour.

The original recipe was to fill a 10" bundt ring, but as mentioned, I've tweaked it and added 50%. I also decided to grate the apple instead of slice, added some bicarbonate of soda and increased the liquid a little. By the way - I'll warn you - you need a big mixing bowl !

Ingredients


6 apples (or 4 large cooking apples) - peeled, cored and grated
1/3 cup of white sugar
6 teaspoons ground cinnamon
3 teaspoons ground ginger

4.1/2 cups all-purpose flour
5 teaspoons of baking powder
2 teaspoons of bicarbonate of soda
3 cups white sugar
6 eggs
1.1/2 cups vegetable oil
1 tablespoon vanilla extract
1 cup of orange juice or milk

Add the first lot of sugar and the spices to the grated apple and mix. Set aside whilst you prepare the rest.

Sift dry ingredients together. Whisk eggs and wet ingredients (except apple) to the dry. Mix with a wooden spoon to combine and then stir in the apple.

Pour into your greased and floured castle mould set on a baking tray. Put into a 170deg Fan oven for approx 1hr 10mins until cooked and a cake tester comes out clean.

Allow cake to cool for 15 mins or so before turning out on to a wire rack.

Sarah-Jane Nash - http://www.siliconemoulds.com/ / http://www.naturalheating.co.uk/ - July 2010

Monday 12 July 2010

Stuffed Courgette / Zucchini Blossoms


I've meant to try cooking courgette / zucchini blossoms for the last couple of years and have never got round to it. Now I'm wondering why I  haven't done this earlier !

The blossoms from courgettes are an extreme delicacy and impossible to buy anywhere other than Europe to my knowledge. With courgettes, the plant produces both male and female flowers. the females develop into the fruits... so it's the male ones you want to pick. Actually, these are summer bush patty pan squash flowers. Patty pan squash are similar in habit to courgettes and you generally cook them in the same fashion.

Remove the stamens from the middle and clean out any bugs. Mine were heaving with horrid little black thunderflies - so I had to be rougher with them than I would have liked. Try gently with paper towling.

Meanwhile, make your filling and tempura batter. Filling is nice but not a neccessity, so leave it out if you prefer.

For the filling - I used a great big spoonful of cream cheese and mixed in a little garlic granules, ground corriander and a tiny sprinking of ground crushed chillies. Season with salt and black pepper. Put a good teaspoonful into the centre of each flower.

For the tempura : 1/2 a cup of plain flour, ice cold sparking water and some seasoning. Mix it into a loose paste with a whisk or fork.

Dip the flowers in the batter and drop straight into hot oil approx 1" deep. Cook each flower for 30 > 60 seconds and then lift out and set on to kitchen paper. I cooked the flowers 2 at a time in a small, deep saucepan.

I'm afraid this is the only photo


There was too much going on in the kitchen. I was trying to cook three different meals tonight - one for Oliver, one for Steve and mine all at the same time. Steve did have a go at the flowers but decided the texture wasn't for him on the first bite. I (on the other hand) thought these were simply fantastic and was all too happy to get to eat the rest myself ! Ooops.... did I admit that ?

Seriously - if you grow courgettes or squash (or know someone who does) - don't miss out on this amazing summer delicacy.

Garlic Parmesan Chicken and Home Grown Veg


I've cropped the first of the vegetables from my veg plot yesterday. It's late this year.....

I was late planting and have done little watering to anything other than the courgettes and beans. It's been so dry and arrid a few potato plants have died. I wasn't expecting any potatoes as they haven't been watered at all - but was pleasantly surprised by a nice haul of little Charlotte potatoes from a withered and dead plant !


These are round yellow zucchini / courgettes. Since then, another 2 were ready tonight. They are very prolific once they get going !


Slice into rounds and put in a roasting dish. Drizzle with olive oil and some fresh herbs (oregano here) and season. 15 minutes in the oven at 180deg C and they're done lovely. I cooked the onion the same way and remaining fennel from the night before.


For the garlic chicken, insert a shap knife lengthways into the chicken breast fillet to make a pocket. Put a good teaspoon of butter inside with some fresh garlic and any other finely minced herbs. Bake in 180degC oven for 20mins.... then scatter over some parmesan and cook for another 10mins

There was plenty of veg without potatoes..... but since they were the first of th year we had some new potatoes with mint too !

Sunday 11 July 2010

Baked Trout with Fennel & Orange


I do cook savoury stuff all the time - but rarely blog about it.

There are a lot of things I want to try, but rarely cook as my husband really isn't keen on a fairly wide range of ingredients. For example, he doesn't like fish or meat on the bone. He doesn't like fruit and wouldn't consider fennel.

You can guess I was the one eating this and he had pizza last night !

Beautiful little rainbow trout - simply stuffed and baked in the oven. I used our fantastic new silicone food ropes / ties to hold it together.


These little food ropes are utterly fantastic and a direct alternative to string in the kitchen. They are reuseable and very easy to tighten and release. Being nice and bright (available now in blue, green, red and hot pink) they are easy to see. They also don't bind into your meat or fish and are very easy to undo. Also ideal for securing open bags of rice, sugar and pasta that otherwise have a life of their own !

 These come in a sets of 4 for a mere £2.25

When I cooked a stuffed roll of pork belly with crackling the other week, I could undo and remove the silicone food ties with one hand ! No trying to dig string out that's got buried into the meat.... or slicing it up to find bits of sting hidden in the gravy.

I also used them for tying a bouquet garni of elderflowers for the gooseberry jam earlier this month.


I gutted, washed and dried the trout - then stuffed with finely cut fennel and a couple of slices of orange. Little seasoning and a drizzle of olive oil - then into a 180deg C fan oven for 15 mins. Turning over 1/2 way through the cooking time. Photo directly above was after I turned it over. The skin had stuck to the roasting tin, but the silicone food ties held the fish and fennel stuffing nicely together.

Simply served with salad , it was a lovely and fresh evening meal

Sarah-Jane Nash - http://www.siliconemoulds.com/ July 2010

Choca Mocha Brain Freeze


It's so so hot here at the moment and we are not used to weather like this in the UK. It's too hot during the day and too hot at night. You can't sleep and are never comfortable.

I came home from work yesterday overheated and tired. Recently, Hana from BB's Muffins explained to me what went into their toffee frappe's and as a result of this, my Brain Freeze has been born.

Into a liquidiser, put a LARGE handfull of ice. Add about 3/4 a cup of milk ... or if you want to be over  indulgent, some milk and cream or milk and ice cream. Add a sachet of Nestle Instant Mocha Cappuchino. Sweeten with sugar if required and blitz until ice is no longer lumpy and has turned to slush.

If, like me - you prefer it a bit stronger, you could add some Camp coffee. Amazing stuff and an avbsolute neccessity for baking coffee cake. Come to think about it - it's been YEARS since I made coffee cake. I must put that on my "To Do" list.

After that - it's ready to pour and enjoy. I think it's like a frappe...

Feel the pain as the cold numbs your sinuses and brain and burns as it goes down.... Ahhhhhh.....

Saturday 10 July 2010

Banana & Chocolate Tear & Share Bread - for Eve !


You may remembar a couple of weeks ago I made an AntiPasto Tear and Share Bread....

I also had an idea of recreating the same as a sweet version with bananas and chocolate which Eve liked the sound of.

I made this for the girls shorlty after, but have never got round to posting the photos...

It's a basic bread dough... tweaked :

500g strong white bread flour
1.1/2 teaspoons salt
4 tablespoons of honey (I used orange blossom runny honey)
Sachet of breadmaker yeast
300ml of milk (instead of the normal water)
30ml approx of olive oil.

Make up as normal bread dough and knead until smooth and silky. Leave to prove until doubled in size.

Knock it back and then roll out into a large rectangle.


After that, it's a case of putting in chocolate chunks and bananas and rolling it up.


This is the second or third row of chocolate and banana being rolled in ! You'll definately get banana and chocolate right the way through this one :-)


Finished bread rolled up like a log is above.


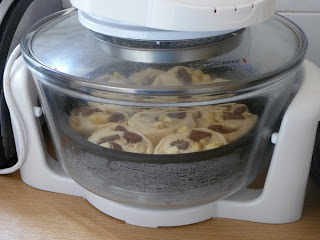
Now I chop it up into rolls about 2" or so deep. These are then spaced out into a 10" diameter silicone bakeware mould. The bread sections will grow into each other and take up the excess space. This is a super handy pan to have and very versatile.. I use this one for loads of things.... bread, cakes, a cooking container on top of the baking tray in the halogen oven / cooker


I then pop it back in the halogen oven for a second prove for another 15 > 20 mins. Halogen cooker is FANTASTIC for proving bread. Set the temperature half way between off and defrost setting for proving bread. It's great summer and winter to keep a constant proving heat.


Whack the heat up to 180 > 200deg C in fan oven or halogen oven and cook for approx 25 > 30minutes until done. On removing, drizzle all over with more runny honey and leave to cool for a bit before serving


I challenge you to ONLY eat one bit !

GIANT Cupcake - How Big ????


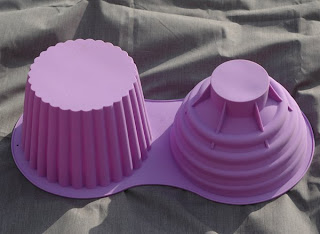
One of the new silicone bakeware moulds we've just got in is for a GIANT Cupcake. I've seen jumbo / giant cupcakes before such as the Big Top Cupcakes and Wilton's version - but this is even bigger still - by rather a lot !

The Big Top Giant Cupcakes claim to be 25x bigger than a normal cuopcake.

Well...... if a standard muffin mix makes 10 > 12 cupcakes, and it takes 2.1/2 batches of mix to fill one side and 1.1/2 batches to fill the other - thats 5 x 10 > 12 .... So ours is FIFTY to SIXTY times the size of those.

Yikes.


When I made the one photographed, I did not fill the entire base mould. I used two batches of mix for the base and 1.1/2 for the top. The base was definately FAR smaller than it should have been .... which makes my photos of the cupcake a little out of true proportion. Ok - so I'm being seriously critical here.

The photo below shows how much mix I put in the base. I used my gran's adapted banana loaf recipe for the base as it's dense and moist. Refrigerated, it'll keep for days. I knew this was a seriously big cake and was initially worried that the weight of the top half of the cake plus icing would perhaps collapse the base ! Actually - I need not have worried - it stood up pretty well.


With both sides properly filled, this cake would stand 11" / 230mm high UN-ICED. That's a pretty towering big cupcake ! With all the mix in the mould, you need to be really careful when moving as the top part isn't so stable as it has such a small foot to stand on.

I think maybe we've made this just a little big ! The top part of the cupcake could do with a bit more support somehow at the bottom.... but that's me being really critical


For the top half of the cake, I used a vanilla type sponge which rises a lot more.


Here are the base and the top. after they have been trimmed on the underside. The top of the giant cupcake has still to be trimmed.


Here is the base, now with some buttercream icing - ready for the top to go on. The banana cake gave it a nice dark outer.

Sara had come over to play and help me ice this up.


Sarah is applying the first layer of buttercream here. We're not too bothered about the lines on the top part. In our opinion, they're a neccessity to hold on the buttercream and stop it slipping off - since you will need a lot of buttercream !


Here it is - ready for final decoration. I weighed the plate first and then the finished cake on the plate so we could get a weight of the cake only. The final giant cupcake weight was 4.2kg - 9.25lb !

We took it with Oliver to nursery for the children and staff to share since it was Sports Day.

I'll get the photos and more info on the Giant Jumbo XL cupcake mould online on our website tonight.

Have a fun weekend !

Sarah-Jane, ww.siliconemoulds.com - biggest UK silicone cookware cook shop. Shipping Worldwide

Wednesday 7 July 2010

Racing Car Cake - The new mould designs have arrived !


Well - you may not hear so much from me for the next wee while - apart from product updates (for anyone who is interested.) Our latest massive consignment of silicone bakeware and soap moulds has arrived. There are oodles of new styles to choose from..... and mountains of work for me to do !

We have really easy things like Jigsaw Cake Moulds. These are basically moulds that you put cupcake / muffin mix into and then the cakes that come out make a picture of a butterfly, rabbit, racing car, heart or turtle. Ideal for kids (young or old) and seriously easy to bake and ice.

First of all - grease and flour new moulds for best results. I've also written a quick do's and don'ts guide below.


Fill cells of mould with cake mix.


This is a big mould and unlikely to fit on top of your baknig tray. Either turn the tray over and slide the mould on at an angle, or remove oven rack before heating the oven and slide the filled mould onto the rack.


As you can see - it's quite a big mould overall.


Comes out 15 mins later like this. Remove the cakes and carefully trim level the top of each one. Then, turn them over and place face down.  Turning it over gives you the perfect flat side to work with. You will need to build the car in reverse. May help to have the upside down empty mould in front of you !


You can push the pieces close together and then ice over the whole lot if you wish.... or leave slightly apart which I think makes it easy for little hands to help themselves.

Ice the top with buttercream / frosting coloured using food colouring. If it's for a biggish kids party, then make two and stack one lot on top of the other with more buttercream or / and jam filling. That's all there is to it ! You can even use packet mix for muffins / cupcakes if you aren't a keen baker.

There are all sorts of other mould styles. I'm still unpacking, measuring and photographing them all. As soon as you see them appear on the website shop with photos, they are ready for sale !


The Do's and Don'ts of Getting the Best from your Flexible Silicone Bakeware
  • Always wash and dry new moulds before first use.
  • Always grease and flour new moulds when making cakes (not required for bread / pastry)
  • Moulds always need greasing / flouring if sugar content is higher than the fat content in your recipe. If it's lower - you shouldn't need to bother.
  • Always use moulds on a baking tray / oven rack. They DO require support.
  • Never lift a filled mould unsupported. They are floppy. The rims of the moulds cannot take large weight strain either.
  • Never use sharp instruments (skewers, knifes etc) on silicone moulds. They'll pierce the mould and it will rip.
  • Never use baking tray liners as oven spillage mats on the floor of your oven - they are not suitable due to oven floor direct temperature (far higher than internal air temperature).
  • Not suitable for direct flame - ie barbeque and don't put it on the hob ring of the cooker when on !