Thursday 28 July 2011

Mini Honey Friands.... and some chicken photos - #4 Foodbuzz 1/8/11


It's quite some time since I last made friands..... that's no mistake. Friands are very rich teacakes with copious amounts of butter and ground almonds which makes them luxurious, moist and ever so morish.

Ah - yes. That's why I haven't made them in so long. They taste SO good. One is never enough. Last time, I gave all but one of my raspberry and lemon friands away as I swear I would have eaten the lot otherwise.

This time was no different. Using a mini friand mould instead of the normal standard size 8 friand mould,  I made approx 32 mini friands from this recipe versus what would have been 10 standard size.


Lightly butter the mini friand moulds and dust with flour. Tap out any excess over the sink.

Place the moulds on top of a baking tray before filling.

Recipe

175g melted butter (I use salted)
110g icing sugar
100g of runny honey
60 g plain flour
120g ground almonds
5 egg whites
.
20 large, juicy raspberries


Sift icing sugar and flour. Add almonds and stir. Whip egg whites to break up until they start to foam, but well before they reach peaking. Add the eggs and mix. Quickly mix in warm / hot melted butter and honey.

Pour into greased and floured Friand mould.  Each cell should be approx 3/4 full. This mix is enough to make 10 standard friands or approx 32 mini friands.

Bake at 190deg C fan oven (210deg normal) for approx 12 > 15mins for mini friands and 20 > 25 mins for large until springy to the touch.

Allow to cool for a while and release from the moulds when still warm.


Well - I must admit, I would NEVER have guessed you were all so interested in chickens ! After all the responses to the chicken run photos, I thought you might like a few more....so I'll introduce a couple of the girls....whilst they are having some free ranging time.


This is FANCY PANTS. Fancy is a blue laced wyandotte. Pretty little hen. She likes looking pretty, but unfortunately she doesn't lay and never has !


This is HENRIETTA. Henrietta is a partridge cochin. Lovely hen with big fluffy bum and legs. She looks massive, but is really just a huge bundle of feathers !


Henrietta and Terminator. TERMINATOR is a blue orpington. When we first got her almost 3 years ago, she was a man eater. Would have a good go at you unprovoked ! Took her a good year to settle down. Thankfully, she has really mellowed and become a really soppy thing.


Here is Oliver helping  break collect the eggs through the pot hole in the Omlet Cube (chicken house). He loves helping collect the eggs and feed the chickens. Those eggs you can see are blue ones laid by the cream legbars (Korma, Dansak and Tikka)


Here is Oliver breaking another egg. This one was an accident. He's got a lot better over the last 2 weeks since I took this photo.... no more broken eggs. The one in the photo got "dropped" into the bowl. Oh well - at least he wanted scrambled eggs for tea !

The rest went into a fresh bowl...


erm - yes... that's another broken egg on the floor to the right of his feet from the day before. He'd decided to collect the eggs unsupervised. A couple got smashed in the garden and a couple slipped out his hands onto the kitchen floor. Thankfully, he now respects that egg collecting must be supervised and he knows he needs a bowl !

Sarah-Jane Nash - www.siliconemoulds.com - large selection of silicone bakeware moulds. 

Wednesday 27 July 2011

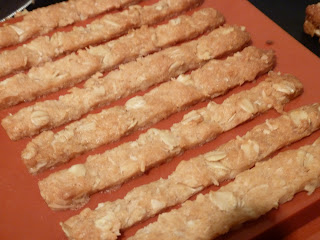
Anzac Biscuit Fingers - Dipped in Dark Chocolate


Because some things just need to be done !

Anzac biscuits sound rather boring. But, when you get round to trying them you will find a delight is in store. They are full of oaty goodness and rather like a chewier version of a  thin flapjack... or bake them longer so they become harder and crispier.

"It has been claimed the biscuits were sent by wives to soldiers abroad because the ingredients do not spoil easily and the biscuits kept well during naval transportation." - source - Wikipedia

I can honestly say that I like them both ways.


This is of the new chocolate sticks moulds we now have available. They are meant for making chocolate sticks or biscuit fingers for dipping. I can imagine they would look fantastic with some chocolate transfers or decorated with sprinkles and gift wrapped !

I've already had a go at some butter biscuit fingers which worked really well... but I never did get round to blogging those photos. 

I've had another go with this mold making some anzac biscuit fingers and dipping them in chocolate. These looked really rustic. They were really rustic. I think that was part of the appeal. There is something that seduces me to nibbling a chocolate coated biscuit finger. That's how it starts. Before you know it, they are being dunked into a cup of coffee and the chocolate sucked off......


Well - they're only little, so I'll let you have another. If you take these to work, put a padlock on your biscuit tin lid. Remind your colleagues that these were MEANT to last a long time and they do NEED to be rationed. A whole handful of them disappearing at a time wasn't how I intended them to be eaten.

RECIPE
 1 cup self raising flour
1 cup of rolled oats
1 cup of grated coconut (or dessicated)
3/4 cup of caster sugar
125g salted butter
3 tbsp golden syrup (or corn syrup)

Cream butter and sugar, then add in flour. Combine these and then add the other ingredients. Mix to combine.

Roll into small balls about ping pong size and then flatten well with your hand (if you want round cookies / biscuits). These do not spread much at all - so do give them a good squish.

If you want to make fingers like these, squish (love that word !) the mixture into each cell of one of the chocolate sticks silicone bakeware moulds.

cook at 160deg C for 15mins for fingers or approx 15 > 20 mins for cookies depending how chewy / crispy you like them.

This recipe made a whole tray of straight fingers, about 8 cookies and most of a tray of zigzag cookie sticks.

After removing from the oven, allow cookies to cool for a few minutes before transferring to a rack. If you have made fingers they will have risen a little above the mould. I found that for best results, I needed to squash them down into the mould whilst still hot. Once cooled down enough to handle, remove from mould. Put them back on a baking sheet into the oven for about another 5 mins or so to harden them up a bit more. I wanted them strong enough to handle as a thin stick biscuit and yet still a bit chewy.


Oliver loved helping dip these into molten chocolate. The only difference was that his never made the rack to cool. They were eaten dipped in molten chocolate. I swear there was more on his face than went in his tummy! These certainly got his seal of approval....

Last weekend was full of excitement. My husband (Steve) has been building Oliver a sit-in racing car for the last few weeks. Oliver has seen it in various stages of being built, but had not got to see it recently until Steve finished painting it.

The big unveiling was on Saturday afternoon......


The car actually needed some adjustment at that point - it didn't drive so well as the drive kept slipping. Still good fun though and I did get some little video clips.

By Sunday, it was sorted and ready to play ! Good grief - Oliver can make that shift now he's got the hang of driving it. He puts the pedal to the metal and Steve has to really run to keep up. Hehe. Just look at the evil grin. He was really moving pretty fast in this photo.

In case you haven't noticed, this car is made up of a load of really strange things. The front is a kitchen SWING BIN. The lid part of the swing bin also forms the boot lid at the rear. The  wheel arches and the front grill are made from a LAUNDRY BASKET and it's powered by an 18v BATTERY POWER DRILL !!!! The steering wheel is for a WII CONSOLE. The windscreen surround is from an old SHOPPING BASKET. I think there is an assortment of other odd bits too...


I can't imagine things get much better for a 2.3/4 yo boy. There were tears streaming down his face he was so happy !


Incase anyone wants to see - here is the first test drive of "THE SWING BIN RACER"


Tuesday 19 July 2011

Chicken, Aubergine & Coconut Curry


The original recipe for this comes from the new August 2011 OLIVE magazine. I've adapted it a little to suit the contents of my cupboards and fridge.

Some months ago, I promised myself that unless I made at least ONE thing from every food magazine I buy, I cannot have another. I do hang on to them for rather a long time and more often than not, it was just a case of flicking through pages and looking at pictures - just food porn and nothing else !

I was quite pleased to see a recipe for an aubergine curry, as one of the few things on Thursday in my fridge was a wrinkling aubergine in desperate need of using up.....

The colour of this curry was rather surprising. It was green. VERY green.. not just slightly green. Even my husband commented when he came in from work "What on earth are you cooking ?"

Flaked almonds were scattered over the top in the original recipe. I omitted these as neither of us really like flaked almonds. I used extra coconut milk and quite a bit of salt as well as using 3 red chillies instead of 2 green ones. Also added the chicken meat.

Recipe (serves 3 > 4)

1 x onion, roughly chopped
2 cloves of crushed garlic
3 red chillies, chopped
1 stalk of lemongrass
1/2 a small bunch of coriander
1 large aubergine
pack of boneless chicken thighs
1 tsp ground cumin
1 tsp ground coriander
1 tsp turmeric
juice of a lime
1 can coconut milk

Whizz the first 5 ingredients in a mini blender.

Add 2 tbsp of cooking oil to a pan and fry the blended ingredients for a couple of minutes. Brown the meat and then add the coconut milk and lime juice. Simmer gently until tender, then season to taste and serve with basmati rice.

Easy week night meal !

Sarah-Jane Nash - www.siliconemoulds.com - July 2011

Sunday 17 July 2011

The Seven Deadly Sins Chocolate Cake


This cake is the essence of all evil. It's BAD very bad. Chocolate covered biscuits, chocolate butter cream (lots of it), brightly coloured candy coated chocolate. Never mind Devils Food Cake. This stuff is demonic. Be warned - it's serious fun and would make a stonking birthday cake - but is a serious chocolate overload.


One good thing is that it is very easy to portion. The sides of the cake are made up of 2 finger bars of Kitkats, held into place with a copious amount of chocolate buttercream. The main part of the cake is a chocolate sponge, split with chocolate buttercream in the middle.

It's actually very simple to make !

Chocolate Cake Recipe

grease and flour or grease and line a two 8" round baking tins - preferably spring form.

  • 2 cups white caster sugar
  • 1 3/4 cups all-purpose flour
  • 1 cup unsweetened cocoa powder
  • 1 1/2 teaspoons baking powder
  • 1 1/2 teaspoons baking soda
  • 1 teaspoon salt
  • 2 eggs
  • 1 cup milk
  • 1/2 cup vegetable oil
  • 2 teaspoons vanilla extract
  • 1 cup boiling water

I use a cup with 250ml volume

Combine all wet ingredients. Sift all dry ingredients into a large bowl. Add wet ingredients and mix until combined.


 Bake in an oven at 180deg / Gas mark 4. I used 170deg Fan oven.

When cooked (approx 30 mins), remove from the oven and allow to cool.


Chocolate Buttercream Recipe

4 cups icing sugar
115g salted butter (soft)
1 tsp vanilla extract
50g cocoa powder
1/4 cup milk
1 cup dark chocolate chips (melted)

Beat the butter and add icing sugar, vanilla, cocoa powder and milk. Beat until smooth and creamy. It is best to use a mixer, and beat for at least 5 mins. All melted chocolate and beat in. If the buttercream is too thick at this point, add some extra milk.

Split the cake in half. Spread some buttercream on one half and sandwich the rest together. Use the rest of the buttercream to cover the top and sides of the cake.

You will need 2 packs of 2 finger Kitkats (I think that's 16 bars) plus an extra finger. Alternatively, you could use  our new Chocolate fingers / dipping sticks silicone mould and make your own ! As kids, we were always overjoyed if we got a Kitkat finger which was solid chocolate with no wafer.


Here are some subtitles for the above video. A toddler speaking in a silly voice isn't always the easiest to understand.

"Hello Bloggers. My name is Oliver and I DO like chocolate cake !!"

Stick the chocolate fingers round the outside of the cake and secure in place with a ribbon. Fill the top part (as full as you want) with Smarties or M&M's. We used just one packet of M&M's. They only just covered the top - but that was plenty candy !

I guess you are wondering why seven deadly sins... Well Oliver had been baking with me as you can see. However, just after this little video (whilst I was taking photos) he decided to go to the chicken coop and collect the eggs.

Naughty Oliver purposely broke 5 eggs. He had enjoyed cracking them on the morning to make the cake far too much ! That's got to be 5 sins..... After that, he decided to get his little chair, go down the back of the coop and try to climb up and pull unripe apples off the tree. The chair went over backwards. Oliver landed in the nettles.... He did get a telling off and no chocolate cake - though to be honest, I found it very hard to be angry with him and he needed lots of cuddles due to the nettle stings. The seventh was for tipping out an entire bottle of bubble bath in the bath.... Tired Oliver = naughty Oliver. Mummy should have known better. That witching time of day just before dinner and bed


Penance was that the chocolate cake was not to be cut that evening. Naughty boys don't get chocolate cake. The seventh sin was mine. Oliver got chocolate cake for breakfast the next morning and promised not to break any more eggs (on purpose that is...)

Sarah-Jane Nash (and Oliver age 2.3/4) - July 11

Tuesday 12 July 2011

Bacardi Mandarin Jelly Shots - Fly Me Away !


Fly fly me away. Soaring into a clear blue sky... just the slightest breath of wind and cotton wool clouds.

Be careful. Eat too many of these and you may join me ! I tried one. It tasted like orange and jelly and sort of like sweeties. I had another and felt decidedly light headed. Jeez - these are D.A.N.G.E.R.O.U.S. but I think they would be spectacular at a party

I don't drink. I don't LIKE alcohol..... but I don't mind it cooked into things as long as it doesn't taste of alcohol. Surprisingly, it's not bad in jelly...


I've recently been inspired by Jelly Shot Test Kitchen. They do some awesome looking jellies which really intrigue me. I've bought their book and I love it. Some super ideas. This recipe did not come from the book or their blog. It was a combination of my own that has thankfully turned out a success. The photos - well - they were a bit of a fluke, but I like with how they turned out. My husband reckons they're just odd. I prefer to think they're one of a kind :-P

 I guess you bloggers want to know how a rubbish snap shotter like me ended up with these crazy blue and orange photos....


RECIPE

This recipe was made in the 8 Dariole silicone bakeware mould.  This recipe fills approx 10 large dariole cells. We also do a smaller 12 cell Dariole mould. The smaller one is the same shape, just half the volume in each cell. It may be better for party jelly shots... unless you want all your guests drunk and disorderly after a couple of jellies !

2 cans of mandarin oranges in syrup
juice of a lime
250ml bacardi
8 to 9 gelatine leaves
packet of orange flavour table jelly
400ml water

Take your dariole silicone mould and verly lightly oil each cell. A couple of droplets rubbed into each one is more than enough. Place the dariole mould or moulds on a baking tray.

Put the 250ml of Bacardi into a bowl with 6 > 7 gelatine leaves. Leave for 5 minutes or so to soften.

Put 250ml of the syrup from mandarin oranges in a saucepan and bring to a simmer. Add the bicardi with gelatine leaves and stir to dissolve. Once dissolved remove from the heat and set aside.

Menawhile, soak 2 gelatine leaves in 200g of water to soften.

In another pan, put the rest of the water and packet of table jelly. Heat until table jelly dissolves. Add the water and gelatine leaves and stir until dissolved. Remove from the heat and set aside.

Put a tiny amount of orange jelly in each mould cell. Put the mould (on the tray) in the fridge for approx 5 mins for the thin layer of jelly to set.

Remove from the fridge. As soon as the Bacardi jelly mix has cooled, pour this on top of the first layer to 2/3 fill each cell. Put back in the fridge to chill.

Once the second layer has set, put some mandarin orange segments in the remaining cell space and top up with orange jelly. You will have used all of the syrup, but only half of the mandarin oranges. These can be used as garnish - or taste great eaten as they are !

Again, chill until set. 25ml of Bicardi in each jelly is quite a lot, so don't under estimate how strong these babies are. 

Iff yuo eat two meany youre furds might get wurdled .....


Ok - so the mad blue and orange photos.... The light indoors was dire. Outside was really bright and sunny. Nice ! The shadows being cast were a royal pain however, so I tried to get rid of them by taking some shots of the jellies on top of my mirror board. Where ever I placed them, I was getting issues with light bouncin back. Infact, it was worse than the shadows.

Last ditched attempt was on a little table right in the middle of the lawn. The blue back ground you see is just the sky. A brilliant blue on a glorious sunny day. That was yesterday. Today has been rather gloomy, very overcast and grey !

Enjoy

Sarah-Jane Nash - July 11 - www.siliconemoulds.com - massive range of silicone bakeware moulds. Suitable for jelly too.

Sunday 10 July 2011

Dulce De Leche & Coffee Set Puddings


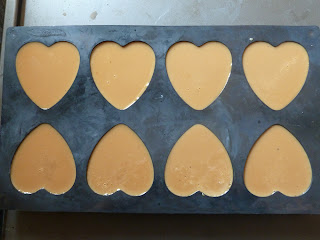
I'm quite pleased with how these turned out. Then again, I'm also besotted with our new 8 cell recessed heart silicone bakeware mould.

These ended up rich and creamy with a richness of caramel Dulche De Leche and undertones of coffee - kind of like a Starbucks caramel latte with cream I suppose !

I'd advise serving them at room temperature. They were really easy to release from the moulds. Literally, just a little squeeze and out they pop.

--------------------------------------------------

Initially however, these seemed a bit of a disaster ! I was playing with agar agar for the first time which had been sent to me by blogger friend Ann Low of Ancoo Journal a couple of months ago. I'm well stocked on agar agar now as my dear friend Zurin of Cherry On a Cake has sent me some too :-)

In case you don't know what agar agar is, it's a vegetarian jelly made from seaweed. It has no taste, so you do  need to add flavouring. It can also set at room temperature, and sets much much quicker than regular gelatine.

The instructions on the packet say to add 1000mls of water, 250g of sugar and 1 pack of agar agar plus desired flavouring. Boil for a few minutes and then pour into your moulds. In Asian countries, pandan leaves are often used as flavoring for agar agar. I like making things that are a bit different from the norm where I can, so decided to work on something that would have my own twist.

1000mls was an awful lot of jelly. I worked out that each packet had 6 tsp - so I worked with just a 1/2 quantity

Recipe

350ml water
3tsp of agar agar powder
1 can condensed milk
4 tablespoons Camp Chicory & Coffee Essence 
You could substitute the Camp Coffee for a shot of expresso. Camp Chicory & Coffee Essence is made in Glasgow, Scotland and has been used in hot milk as a type of instant coffee (and in baking) for over 100 years. It's lovely in coffee cake !

Anyway, I put the water and agar agar into a saucepan and brought to the boil for 2 or 3 minutes before adding the coffee extract.

I then removed half a cup of the mixture and set aside.

To the remaining mixture, I added the can of condensed milk and stirred off the heat before pouring in to the 8 recessed heart silicone mould. I added less liquid than the started 500ml as I figured that I likely did not need as much given the condensed milk was a 450g (approx) can and runny.


Well - when removed from the mould, they were almost like rubber blocks and really really firm. When I tried to bend it a little - it felt like it snapped in two ! The texture was not to my liking, though they tasted ok. At that point, they were just creamy and a bit of a coffee taste too.

I decided it would be best to melt them down again and add some more water, so I chopped them up and shoved them back in the pan with an extra 150ml of water on a low heat.

This is where something decidedly odd happened.....

The condensed milk started to turn into caramel on the bottom of the pan - despite the fact it wasn't really that hot. I barely got the temperature up to as high as simmering before taking it off the heat !

Pouring it into the moulds this time, it was considerably thicker than the first time. The really odd thing was that I ended up with EXACTLY the same finished volume the second time - despite having added another 150ml of water. Where on earth did it go ? I can imagine that much would evaporate in such a short time !

Thankfully, after a second set, the texture of these was much better.

With the remaining agar agar (without condensed milk) I added 2 tsp of sugar and approx 70ml of water and warmed it in a saucepan.

I then scratched the recessed area inside the heart jellies (so the next layer would adhere) and filled each recess with the liquid

That's it !

These do taste quite yummy. The textures of agar agar is however very different to conventional gelatine and I don't really know yet that I like it. I'm very tempted to recreate this using gelatine leaves at some point as a direct comparison

Sarah-Jane Nash - www.siliconemoulds.com - July 2011

Friday 8 July 2011

Roses - Cupcake Bouquet (Tutorial)


Aren't cupcake bouquets beautiful ? So different, inexpensive to make and a lovely home made gift.

My first ever attempt was a mini cupcake bouquet. That later evolved into my idea for the rosebud fudge candy bouquet.

More recently, I had been admiring photos  last week of one a customer had made, and she directed me to some YOUTUBE videos (try searching for cupcake bouquets)


I made this on Monday (I think) - could have been Tuesday. I forget as much of this week has become a blur. Certainly, I started it one day and finished it the next ! That's what happens when you start a project at 2am. I made two lots of  the framework at some silly hour of night and made / iced the cupcakes the following morning.

To make the framework / base cupcake bouquet you will need the following :

1 sheet of green tissue paper
2 sheets of tissue in colours of your choice
1 piece of cellophane (optional)
an old cardboard box (preferably double wall thickness)
a staple gun
double sided sticky tape
glue gun (optional)
7 disposable plastic cups
1 metre length of ribbon

The first thing I did was fold the green sheet of tissue into four along the long side and then the opposite way into thirds. When cut, this gave me 12 squares. These tissue pieces were for going inside the cups to create a leaf effect.

I folded each square in half (across the diagonal to give a triangle) and each triangle in half to give a more elongated triangle. Then, snip the bottom 20mm / 3/4" off. It's just like the photos for cutting the circles - except you care cutting off the bottom part rather than the top.

When you unfold it, you will be left with a square which has a circular hole in the middle.

Originally, I tried taping them to the outside of the cup, but that did not give as good an effect. Taping them to the inside was a really slow job and very fiddly. Through trial and error, I found it was easier to do it as below :


Take two plastic cups. Put the cup base through the hole in the tissue square. Secure with a small piece of double sided tape approx 1/3 of the way up from the base of the cup. Put another piece of double sided tape on the opposite side of the cup.

Peel off the backing tape from both bits of tape. Gently squash the top of the cup with one hand. Take a second cup and insert the cup (with tissue on outside) about 1/2 way in. The tape will grip the inside of the cup and stick the tissue on the inside as you  remove the inner cup.

With all the cups done, it's time to piece them together. You have three choices here. A stapler is the fastest and easiest. It is likely to split the cups though, so put some sticky tape on them before you staple. Alternatively, you can use double sided sticky tape as I did on one of mine. It's possible to also use a glue gun - but be careful - the plastic cups melt a bit with the hot glue. I stuck my fingers together. Hmmm.

You want one cup in the middle(rim higher than the rest, and fasten the other cups round the outside


Take another sheet of tissue. Fold one corner up to meet the side across the diagonal. Cut the remaining strip off. Opened up, you now have a square. Keep folding across the diagonal and then cut the top piece off in an arch. When you open the paper up - you should have a circle (or something that resembles one !). If you want a really full and fluffy wrapped bouquet, also cut a piece of cellophane wrap in the same way


Draw round a 6" / 150mm saucer on to a piece of card and cut it out. You need to stick this to the bottom of your plastic cup to complete the frame. Glue gun works best, but I also had good success with double sided sticky tape. 

Put the glue or tape round the outside edge of the base of the cups and press the cardboard disc to the bottom. Place this on top of your tissue / cellophane circles. Bring the sides of the tissue / cello up. It's handy to have someone hold this for you - but if it's 3am and your husband is asleep.... I'd suggest a bit of double sided tape on either side to help keep it in place !

Tie the ribbon around the base to secure.

Now the base is done, all you need to make is a batch of standard size cupcakes and some buttercream icing. This mould is ideal. We also keep a wide selection of paper case cake liners

I used the vanilla cupcake and buttercream recipe I posted back in February here.

To pipe the roses, I used a disposable piping bag and a closed star tip..... But I believe a Wilton 1M tip gives even better results !


Take the piping bag, and using a small brush, apply some gel paste food colouring to the inside of the bag. You need only a very small amount. Rub the sides of the bag together. Snip the end off and insert the tip. You may need to wipe excess colour off the tip end with a cloth after insertion. The colour on the inside of the bag is going to create the two tone effect on the edge of the piped rose swirl.

Squeeze a little of the buttercream through. The colour will follow. After that, you can pipe the swirls. 

Start on the inside and pipe round the outside in a circle. Super video of it being done here

Once the buttercream on my cupcakes had hardened off, I popped them into the plastic cups. The cups hold them securely in place. Nothing else is needed.


I've been keeping my husband busy this week. We've been building a run for the chickens. It's not totally finished yet as the company that supplied it have not sent all the correct parts for the roof and there are loads of bits missing. Pah. They've promised twice to phone me back and sort it - nothing yet..

Chickens have been free range in our garden for almost 2.1/2 years now and give us loads of lovely fresh eggs. At this time of year, too many. Scrambled, fried, boiled, omlet, in cakes and still excess to sell. In the winter, very few.

Korma, Dansak, Tikka, Terminator, Custard, Blackie, Feathers, Henrietta and Fancy Pants.

 I really didn't want to pen them in - but the garden is pretty much destroyed. They've dug massive craters in the garden that used to be a  lawn (WHAT LAWN ??). Craters big enough they can jump in and hide.

 Open the kitchen window just a little, and they squeeze in and sit on the sink draining board. Leave the back door open for two seconds and they're in the house. In as quick as you can turn round, there will be a chicken in the living room watching tv or sitting on the sofa. I swear - they are taking over !

Korma likes to sneak in and stand in front of the kitchen cooker. We joke she's oven ready.

Well - they are going to have a massive run. Between that and Oliver's trampoline, there isn't a great deal of space left....but ..... I'm looking forward to being able to open the door again and not be falling over a rabble of chickens begging for some pasta or rice !  Shame we have to restrict their free ranging, but it's got a bit silly.

Anyway, hope you enjoyed this slightly different blog entry. It's a bit more crafty this time - but still food orientated :-)

Sarah-Jane Nash - www.siliconemoulds.com - silicone bakeware / cookware -  July 11

Monday 4 July 2011

Rose Petal & Strawberry Jelly Filled Heart Sponges


The roses have been in bloom in our garden. Only one or two at a time. Then BAM - about 8 open on one day. Yippee - finally, there are enough to do something with. I wander down the garden with a pair of scissors and sadistically chop all the heads off..... 

These were not for a vase - they were to cook and make into a jelly (seedless jam).

Oliver was rather bemused as I pulled all the petals from the roses and then told me off for ruining them. He soon changed his tune when it came to blitzing them with a hand blender and he wanted a turn !

RECIPE FOR STRAWBERRY & ROSE PETAL JELLY

3 cups water
juice of a lemon
juice of 1/2 a lime
2 cups granulated sugar
75ml liquid pectin
200g strawberries
petals from approx 7 rose heads

First of all, remove all the petals from the rose heads and check for "wee beasties". Gently rinse under clean, cold tap water. 


Put the rose petals in a jug with the water and blitz with a hand held mixer. Rather reminds me of making "perfume" as a kid !

Put your blitzed rose petal soup into a pot and bring to the boil. Turn off heat and leave to stand for about 30mins. Strain through muslin to remove the petals (which will now look a funny white / grey colour). Put the liquid back in the pot. Add mushed strawberries, sugar, lemon and lime. Boil for approx 10 minutes.

Strain again through a muslin cloth to remove strawberry seeds and remains. Careful ! The liquid will be very hot (unless you have loads of patience and let it cool first)

Put liquid back into the pot once more. Add the pectin and boil for approx another 10 mins or until it starts to thicken slightly. Remove from heat and pour into warm, sterilised jars. Fills 3 small jars.

Use to spread on to home made scones or fresh bread. Works well for filling little cakes too !


These little cakes were made in a brand new silicone bakeware / cake mould that we now have available. The new 8 Recessed Heart Mould has heart shaped cells with a recessed heart shape internally within each one. This creates a perfect little cavity to drop in some of the rose petal and strawberry jelly....

A basic 2 egg sponge mix will fill all 8 cells nicely

Grease and flour each cell, tapping out any excess before filling with cake mix

(I use 60g butter, 60g sugar and 60g of self raising flour + 1 egg. This can be multiplied as required for a basic sponge)


Fill cells 3/4 full with sponge mix 


Bake at approx 160deg C Fan oven for around 18mins or until done.


It will look like this coming out the oven. Allow to cool for 5 minutes or so until cool enough to handle. Flip the mould over and the heart cakes will come out.


Once totally cooled, put BACK in the moulds and cut the tops off the cakes with a serrated knife level to the top of the mould. Turn the cakes back out and they will all now have neat, even bases.

Drop a spoonful of (preferably) home made jam or jelly into each cavity.


Share with a friend and some sticky fingered toddlers (that like sucking the jammy bit out the middle) and then feed your cake to a bunch of scrounging chickens that are patiently waiting on leftovers !

Thanks for posing Nicky & glad you enjoyed them :-)   The boys had fun when they weren't fighting ! x

Sarah-Jane Nash. Happy summer days - www.siliconemoulds.com  - July 11

Saturday 2 July 2011

Belgian Loaf (Tea Bread) - Dedicated to My grandmother


It had been some years since I last ate Belgian Loaf and to be honest, I've been putting off making it..

Belgian Loaf was something my grandmother made and I have lots of memories of visiting her and having this still warm from the oven or cold and slathered with salted butter thick enough you could see teeth marks in it. It's really good toasted too.

I have my grandmother's recipe book, which was very tattered and well used. Part of me has wanted to make this for some years now, but the other part wanted to keep it just as a memory. At a guess, it's been around 10 years since I last had a slice of this...

However, I also felt it fitting that Belgian Loaf should somewhere make an entry on my blog, and I think Gran would be proud if she was still with us.....

Belgian Loaf is a kind of sweet tea bread - sort of like a fruited sweet bread cross cake.


Recipe

1 cup of milk
1 cup of sugar
1 cup of raisins
4oz butter or margarine
2 cups of plain flour
1 beaten egg
1/2 tsp cream of tartar
1/2 tsp baking powder

Preheat oven to 180deg C fan

Pour milk, sugar, raisins and margarine / butter into a large pan and bring to the boil.

Leave to cool, then  add all sieved dry ingredients plus beaten egg and mix in well.

Cook in a greased and floured 2lb loaf tin or silicone loaf mould for about 50mins or until a skewer comes out clean


For once, it was a beautiful bright sunny day with beautiful blue skies. These old byplanes kept flying around from a nearby airfield.

Sarah-Jane Nash, July 2011 - www.siliconemoulds.com - silicone bakeware specialist cook shop