Thursday 31 October 2013

Golden Maple, Bacon and Chocolate Macarons - Mastering Macarons (Classes)


The idea of these may be enough to initially turn your stomach, but believe me ... it really REALLY works !

Maple syrup and bacon have been paired together for a very long time in good old US of A, but it's something that has never really become a big thing in Western Europe.

If you have a surf through the web, you will also find that maple and bacon cakes, doughnuts and even popcorn are all in trend at the moment.

I had the idea of combining chocolate, maple and bacon in macarons some time ago, yet didn't have the heart to commit to making a whole batch of macarons to find out nobody liked them...

Well, my storeman; Colin, wanted to make some macarons for his parents Golden Wedding Anniversary. Colin came in one night and had a masterclass in macarons. We made a batch of chocolate and coconut macarons (airbrushed gold) and some blueberry and lemon.

I pinched a tray of chocolate shells and filled them with white chocolate ganache with some maple syrup and candied maple bacon. Top with another piece of crispy maple bacon, and be transported to heaven !


RECIPE

180g icing sugar
40g cocoa powder
180g ground almonds
180g egg whites (split into 2 batches)
1 tablespoon Camp Coffee 
80ml water
200g caster sugar

Finely grind the almonds and icing sugar together until it no longer feels gritty when rubbed between your fingers. Sift into a large bowl. Add one batch of egg whites, and the cocoa powder. Stir to combine into a thick paste.

Put the caster sugar and water into a pan and boil until the syrup reaches 110deg C.

At this point, whip remaining egg whites to firm peak.

Remove sugar syrup from heat when it reaches 118 > 120deg C. Pour this in a slow stream onto the egg whites whilst whisking constantly. You will need a hand or stand mixer for this. I prefer to use my hand mixer when making macarons. Whisk until thick and shiny and fairly cool.

Fold into the paste with a spatula until a ribbon of mixture fades into the surface within about 30 seconds.


Pipe on to on of our revolutionary double sided silicone macaron mats. We now also have these mats in bright red and they should be on the website next week.

You want to leave about 5mm space around the macaronage on the mat as you pipe. Once it's sat and relaxed for a few minutes, it will spread.

Put in a preheated fan oven at 160deg C for 5 mins with the door open, then close the door and bake for another 18 > 20 minutes until done.


I made the shells for my blueberry and lemon macaron shells into a crazy tie-dye effect.

Colin's were simply bright yellow - but the impressive thing was the fact he managed to make 75 PERFECT macaron shells despite having never before attempted any form of baking.

Way to go Colin - they're awesome !

Mastering Macaron classes will be available to book in our cookery school here in Attleborough, Norfolk from December 2013


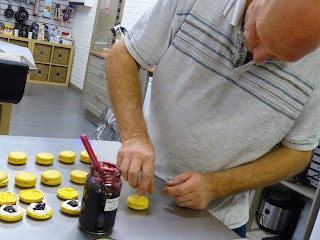
Colin was a little shaky using a piping bag, but really got the hang of it. I managed to snap him filling his shells :-)


Sarah-Jane Nash, www.siliconemoulds.com and www.sarah-janeskitchen.co.uk

Friday 18 October 2013

Bobby's Blue Ombre / Petal Ruffle and Sugar Pearl Christening Cake


These photos are of a christening cake I recently made for a very poorly little boy called Bobby.

I met Bobby and his mum a few months ago in HDU at Norfolk and Norwich hospital whilst visiting a friend

Bobby is constantly in and out of hospital and also has care in the local EACH children's hospice.

I cannot imagine how Sarah (Bobby's mum) manages all that she does. Sarah is a true inspiration and utterly incredible. 

I made this christening cake for Bobby's christening as a gift. I hope they received the same amount of pleasure and enjoyment from it as I did in creating it.


The bottom tier was vanilla sponge and covered in layers of blue ombre petals - each layer a little darker than the one before.


The little christening shoes were hand made from sugarpaste and I think Sarah kept them as a keep-sake.


Top tier was chocolate and covered in hundreds of sugar pearls......

Sarah-Jane Nash - www.siliconemoulds.com
www.facebook.com/SiliconeMoulds

Thursday 10 October 2013

Obsessed with ...... Chocolate Shoes !


I've recently discovered I have a new obsession. SHOES.

Pink shoes, blue shoes, sparkly shoes - doesn't matter ..... as long as they are CHOCOLATE SHOES !

The first one I made, was the pink one on top of this cake...... I didn't want to let it go !


Sharon :

OMFG
Look at my cake!!
Hands off the chocolate shoe, its all mine!!


The next one I made, was a sparkly purple love affair.....

Are you falling in love with my chocolate shoes yet ?

I sent it to my mum.....


Well, my beautiful, sparkly, purple, all-white-chocolate shoe arrived today! It's JUST like the photo. Sarah-Jane is SO clever. I put it in the dining room as it's coolest there. My dining room now smells like a chocolate shop!

 — with Sarah-Jane Nash and Sarah-Jane Nash.How much of a TEASE is THIS!!!! I want to eat it - but I want to look at it. I want to look at it - but I want to EAT it!!! If I eat it, though, I won't HAVE it any more. OK, I've decided. I'm going to have to stop breathing or wear a clothes-peg on my nose............... it's a KEEPIE! x


This next one was two tone - with a gold patent finish and in two tone. The sole and heel were milk chocolate and the top was white chocolate. 


This one went to Naomi, my brother's girlfriend. I think she liked her shoe !

These shoes are all about a size 6 - big enough you could practically put your foot inside. I think they need to come with a warning, that they will melt if worn.....


Naomi : Oh my GOD!!! A white chocolate stiletto!!!! Don't know whether to wear it, eat it or rub it on my naked self  so happy  — with Sarah-Jane Nash.


Full intentions of having some custom shoe boxes made to pack my chocolate shoes and have them look their best.

Hope you enjoyed looking at my creations !

Sarah-Jane Nash - www.siliconemoulds.com

Oliver, Emma and Starting School ! - September 2013


Better late than never.... been meaning to post these photos for a few weeks.

A month ago, Oliver (aka The Little Cake Tester) started school. Here he is with his girlfriend, Emma, who is now in Primary 2.

He'll be five in two weeks - just where did the time go ?


Last day of nursery school - escaping over the fence !


All ready to start school, in his new uniform and with an empty school bag !


Lining up with the other children to go into class for the first time. How cute !


Two days later, Oliver and Emma had a cinema and lunch date.

These two act like an old married couple.
They plan to get married and live in Scotland with a holiday house in Spain !


Followed by a trip to the sweet shop - for the biggest lollies ever, ever, ever !


Wednesday 9 October 2013

Scary Edible Eyeballs - Marshmallows To Trick or Treat ! HALLOWEEN


Anyone fancy an eyeball ? 

I had a blast making these up this afternoon. From the moment I thought of the idea, I just knew that my little boy (Oliver) would adore them. 

Oliver has his 5th birthday coming up, and his party will be on 27th October - which is rather close to Halloween. I rather like the idea of potting up these edible eyeballs with some green gummy jelly in pots for his party bags and perhaps filling a chocolate skull with them too.

"Oh WOW - you're the coolest Mummy I know !", Oliver declared on the way home tonight. I'm guessing that means that he likes this idea..... Certainly made me giggle !


Might be even better with red goo in the middle. Deeeelicious !

Want to know how to make them ?

You will need : 

gel paste food colouring (I used black, blue and green). I prefer Wilton gel pastes as they dissolve easily in water, whereas some of the others don't. 

cocktail sticks

piping bag - I use these disposable 18" ones for this (you can wash out and re-use...)


cake release spray - or sunflower / vegetable oil

2 or 3 plastic 3ml pipettes (or small, empty syringe - available from chemist shops)


INGREDIENTS - makes 30 eyeballs ( and a little spare mallow)

FOR A SMALLER BATCH, MAKE HALF THE RECIPE VOLUME

pack of Gelatine granules. I used Dr Oeteker.
300g sugar
2 egg whites
water
some flavouring (vanilla extract, essences or Lor-Ann candy oils)

Make sure your flavourings are CLEAR.

PUPILS AND IRISES

Prepare your 4 x 15 cell semi sphere silicone bakeware molds by spraying with cake release spray, or oil using a vegetable oil on some kitchen roll. Marshmallow is the stickiest stuff you can imagine. If any of the mould is not properly prepared, the marshmallow WILL stick to it !

Put 50g of sugar and 100g or mls of boiling water into a jug. Stir to dissolve.

Set aside until luke warm, then sprinkle over a sachet of gelatine granules and stir well.

Pop this in the microwave, and cook in short bursts. Once the gelatine is all dissolved into the sugar solution, it is ready to use.

Pour about 1/3 of this into a separate bowl. Use a cocktail stick to add some black food colouring gel paste and mix well. The colour needs to be strong - not wishy washy - for the desired effect.

Using a pipette or syringe, put 3 drops of the black gelatine solution in 30 of the cells.


Take the remaining solution and colour it as desired for the iris. You may want to split into two or three batches for multiple colours.

Do not worry if it is setting hard too fast. You can zap it again in the microwave.

The gelatine mixure needs to be warm and very fluid. If you start getting lots of bubbles on top of the solution after piping, it may be getting too cool. 

Do make sure it's also not too hot - as we don't want the colours to bleed into each other.

By the time you have put black solution in for all the pupils, the first ones will have set. Go ahead and put approx 2mls of your coloured solution over the top of the set black gel.


It will now look like this....


The next stage is to make the marshmallow. This is a stronger / little more dense marshmallow than my normal recipe, as I want the eyeballs to stay intact even if subject to quite a lot of handling. As a result, it WILL start to set up on you quickly once mixed - so you need to work fast.


MARSHMALLOW

Put 500g of sugar and 250g of water in a large, heavy based pan

Put the sugar thermometer in, and turn on the heat. DO NOT STIR.

The sugar needs to stay on the heat and boil until it gets to 120deg C


Put 125ml of cold  water in a cup or bowl and add 3 sachets of gelatine granules. You can add flavouring to this as desired. I used 5 drops of Blackcurrant Lorann Candy Oil (use a pipette - it's strong stuff... Stir well and set aside....


When the sugar syrup gets to about 110deg C, whip the egg whites to firm peak.

Remove sugar syrup from heat at 120deg C. Allow  a few seconds for the bubbles / boiling to subside, then stir in the gelatine granules mix and dissolve.

Using a hand mixer on highest speed, whip the egg whites whilst pouring in the hot sugar syrup mix. It will be really soupy to start with. Whip hard and fast until thickening and increasing in volume. It needs to remain pourable.

Transfer into an 18" disposable piping bag. Snip a tiny bit off the end, and then pipe the mallow into all 60 cells, until level with the top of each cavity.

That's it !

Leave alone for a couple of hours, undisturbed.

Carefully, place one mould with the pupils and irises on top of a mould with just plain mallow cells - carefully making sure they line up.

Press down gently on the top of each cavity, to make sure the bases of each mallow stick together.


When the top mould is removed, you'll have eyeballs just like these !

Lightly oil your hands with vegetable or sunflower oil (or cake release spray).

Remove eyeballs from mould. The small amount of oil on your hands will stop the mallows sticking to you or anything else. These can now be potted up with some jelly in little pots as I did, put onto lolly sticks (dip stick in chocolate first), eaten as is, or frozen for future use.


I so want to make a specimen jar full of eyeballs and jelly worms !

Emma and Oliver loved them !

Happy Halloween when it comes .....

Sarah-Jane Nash, www.siliconemoulds.com - 10/10/13

Saturday 5 October 2013

Making Life Size Chocolate Skulls - Includes Tutorial Video - Halloween !


How about making this life - size white chocolate skull for Halloween this year ? 

That's exactly what I did using the Wilton Dimensions 3D Large Skull Pan / Mould.

My skull was 750g of white chocolate. My little boy, Oliver loved smashing it up with a rolling pin ! I've also promised to make one for his class at school. That one is to get stuffed with jelly snakes / worms and used like a pinata for a mini halloween party.

My chocolate skull turned out so well, that due to many requests - I made another chocolate skull and filmed a video tutorial at the same time. See how to make it in the links below.

It's actually quite easy, though you do need to know how to temper chocolate. Other than white couveture chocolate, the only other things you need are modelling chocolate (easy to make) and some luster dust or tint powders to decorate.

Chocolate workshops are now available in our cookery school in Attleborough, Norfolk (UK). We will be running some novelty chocolate classes and chocolate truffle workshops in November and December. Dates to be launched in the next few days.  Keep an eye out on www.siliconemoulds.com for more info.


Here is the fun we had smashing this creation !