Showing posts with label Halogen cooker. Show all posts

Wednesday, 16 February 2011

Doughballs with Mozzarella and Garlic Butter (for dunking)


These were oh SO good. Terribly fast and a super way to use up some left overs !

Last weekend I made pizza. When I make pizzas, I generally make up a bread dough mix for a 500g loaf and then divide this into portions. Each loaf mix makes approx 4 pizzas or 2 great big ones for sharing.

We had one big pizza last weekend and after the first rise, I bagged the remaining half the dough in a ziploc bag and shoved it in the fridge. It seems to survive in there for up to a week no probem. I can then either pull it out and shape for more pizzas or a few fresh rolls. As it has already had a prove, the second prove is fairly quick as long as your kitchen is warm !


This time, I used half the dough in the fridge (1/4 of a batch) to make these little dough balls. Basically, they're just micro rolls !

Pinch off little balls of dough. Press a small piece of mozzarella (if desired) into the middle of the dough. I wanted final size to be around the size of a ping pong ball - so they only want to be tiny... about half that size before they prove.

Dip the dough balls quickly in some milk or water and them roll them in semolina. I hate that stuff for puddings (bleurgh) but it gives a lovely texture to the outside of breads.

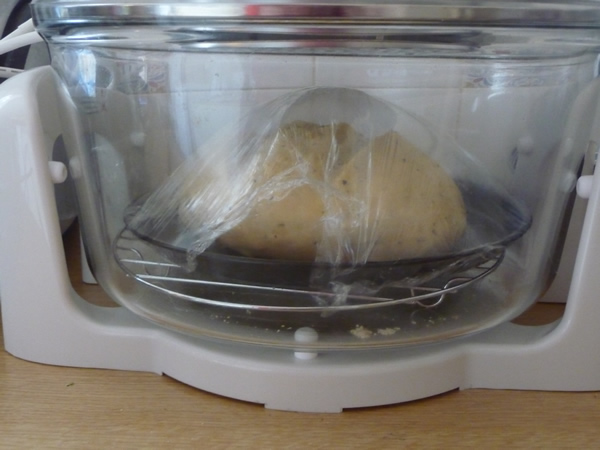
Place them spaced apart on a baking tray. My kitchen was cold as the heating was not on, so I put them on the circular tray for my halogen oven cooker and loosely covered in cling film. The halogen oven is fab as it heats up in lightening fast time with no preheat required. It also uses jsut 1/3 of the power of my conventional fan oven !

Then I popped them into the halogen oven to prove with the heat set half way between off and thaw for approx 30 mins until doubled in size.

Once proved, remove the cling film and pop into a preheated oven at 180deg for approx 5 mins until JUST starting to colour. Alternatively, just remove cling film and turn the halogen oven on for about 7 > 8 mins with no preheat at 180deg C.

Serve alongside some melted garlic butter for dunking.... or drizzle the garlic butter over the top and allow to soak in.


Basic Bread Recipe

500g strong white bread flour
1 tsp salt
1 sachet quick action yeast (same stuff they use for breadmakers)
1 tablespoon sugar
approx 300ml of luke warm water

combine ingredients and then knead until gluten develops and it becomes silky. Put aside in a warm, draught free place to rise until doubled in size.

Knock back. Either then put it into a 2lb loaf tin or mould (if you prefer not to make it free form) and leave for a second prove - or divide up for pizzas etc.

I don't bother second proving for pizzas. I just roll it and use it.

Any left overs, pop in a ziploc bag in the fridge where it will keep for a week.

Dough balls like these make a lovely side dish and any left overs are ideal for tiny tiny micro rolls for toddlers like mine !

Monday, 14 February 2011

Whisky Orange Marmalade


It's been some years since I last made marmalade and home made is SO many times better than shop bought. Seville oranges are coming to the end of their short season now - so get your hands on some quickly if you get the chance.

I actually made this a couple of weeks ago, late one evening. I had not managed to get hold of any seville oranges, but the normal ones are superb anyway at the moment - so I just used those.

Normally, white granulated sugar is used in marmalade. Sometimes, if you want a really dark and strong marmalade - a big spoonful of black treacle will be added to the pot.

In a moment of genius, I decided to use light brown soft sugar instead of regular white granulated. It adds soft caramel tones to the marmalade. It makes the marmalade taste is really smooth and it's full of flavour but not bitter.

900g oranges
2 lemons
1kg sugar
1.7litres of water
150ml Scotch whisky

How you prepare your oranges may vary. I chose to squeeze the juice out of mine into the pot with the water, scrape out the pith and seeds and suspend these in the pot in a muslin bag. I left the lemons whole and finely sliced my orange peel. Boil for approx 2 hours until the orange peel and lemons are softened.


After that - I decided it was a total waste to chuck the lemons away ! Instead, I cut them open and squeezed out the juice. It's much easier to remove the pith and also to slice the peel up AFTER they've been boiled first - so next time, I'd boil the fruit more.

Discard pith / seeds and add sugar and whisky. Boil until temperature reaches setting point on a sugar themometer. Remove from heat. Allow to cool for 5 mins before bottling into warm sterilised jars.

I sterilise my jars in my halogen oven cooker. It will generally take about 8 jars at a time. With no preheat and only using 1/3 of the power of my conventional fan oven, it's quick and energy saving.


Ok ok.... you want to know what REALLY happened ???

Well - Oliver had been a little poorly, so I had not been out with him that day to feed the ponies. When my husband came home, the oranges in water were boiling away nicely. I asked him to keep a check on it whilst I went to go and feed the animals.

By the time I got back,  he'd forgotten about the pot on the cooker ..... The oranges / lemons were close to having boiled dry ! The kitchen was full of steam with the amount of water that had boiled off.

I added some more water to the pot... not really knowing how much it needed along with the whisky but guessed it would need to boil a bit longer thna normal with the sugar in to reach setting point..

I brought a bag of sugar from the cupboard to add to the pot and on the way fell over a toy fire engine that had appeared by magic. The sugar was all over the floor and not fit for use. After a clean up, I discovered that the only sugar left in the cupboard was light brown soft. That's how it got to be in my marmalade. A lucky emergency ingredient that made a wonderful addition and amazing substitue !

Sometimes things don't go smoothly....

Sarah-Jane Nash - http://www.siliconemoulds.com/ silicone bakeware moulds cookshop and online store.

Monday, 4 October 2010

Cooking With Table Top Halogen Ovens / Cookers


Well - I've had umpteen email requests over the last week or two for some more halogen oven meal ideas.

I must admit, I've got rather lax in this area. I use my halogen oven most days (unless I'm doing lots of baking for work or need a full size oven). It's just that when I get home from work with a hungry toddler and a husband arriving in not long after - I simply forget to make note or take photographs. Not surprising really I suppose, and I'm sure few of you rarely take photos of your dinner !

Well - first up is some stewed plums with greek yogurt. Plums and apples are in season right now and both of these autumn fruits are a real delight to eat. These were some of the last of the year's victoria plums which were halved and stones removed. Sprinkle well with some cinnamon (if you wish) and some granulated sugar. Leave to sit for around an hour for the juices to start to come out the plums. Generally works well if you prepare this before cooking and eating your main meal.

Pop in the halogen oven in ramekins for approx 10mins at about 180 > 200deg. Serve hot with a dollop of greek yogurt for a healthy and tasty pudding..


Fat and juicy butchers sausages. These sausages are from our local butchers - Tony Perkins. Tony's shop in Attleborough, Norfolk has had a total overhaul and is really fab. Go and check it out if you are local.

I cooked these sausages in my Sarah-Jane's Halogen oven on the baking tray upon the top rack. As I like to grill them, I tend to set the temperature to around 225deg C and cook for about 10mins.  I never bother turning them. They are beautifully browned. Serve with some hot english mustard in a crusty roll or chopped up and thrown in a pasta bake - there is a multitude of things you can do with them ! Best of all, no smoke alarm going off - easy cleaning up and no burnt bits :-)

You'll see there is barely anything comin out the sausages - that's cause they are so darn good !


Next up is my chicken calazone. Even the bread bit is home made.

First of all, make up a batch of bread dough. You can use a 500g bag of premix for a bread maker and knead it by hand. Alternatively, 500g strong white bread flour, a sachet of bread maker yeast, teaspoon of salt and a tablespoon of sugar. Add approx 300ml of warm water to it and bring together in a bowl. Feel free to add in some chopped fresh herbs, chopped olives, bits of sundried tomato, etc

Tip on to work surface and knead for approx 5 > 10 mins until becoming elastic. Leave aside in a cling filmed bowl for about 15 > 20 mins. I don't want this to rise much as it is for flat breads - but it gives me time to get on and cook a couple of bell peppers in a pan with a drizzle of olive oil..

When the peppers are done, put aside in a covered bowl.

I've got two lemon pepper chicken breasts here - again from Tony Perkins - which have been butterflied. Tony will happily coat them in lemon pepper coating or a multitude of other things he offers in his shop. Lazy, but ideal for a quick dinner ! I cooked these in the halogen oven on the baking tray / top rack at approx 200deg C for 12mins. Then I added the peppers to reheat for another 3 > 4 mins


Whilst the peppers were cooking, I cooked the flatbreads. Divide the dough into approx 6 balls and roll each out into a large, thin circle. Pop into a dry, hot pan and cook until bubbles rise on the surface.


At this stage, they are ready to flip over.....

Once both sides are done - you end up with these : 


Put them on a plate and cover with tin foil to keep warm. I had a load exttra left - which is fine as they reheat great the following day..


Here's the sliced lemon pepper chicken breasts. You can see how wonderfully moist and juicy they are !

To fill, I just microwaved **CHEAT ALERT ** a jar of tomato and chilli sauce..

Add some of the tomato chilli sauce, 1/2 a sliced lemon chicken breast, a few slices of bell peppers, some black olives and crumbled feta. That's it ! One chicken breast can easy serve two people and this is not a skimpy dinner by any means despit the fact it's fairly frugal and low budget :-)


Sweet potato wedges, bokwurst german sausage and fried onions

A fast and easy weekend meal - ideal for when my stepson is staying over.


First of all, chop up some sweet potato into wedges. I tend to leave the skin on. Toss in a little olive oil and season well. These are in a 10" silicone cake baking mould , on top of the tray and on the bottom rack. I use that mould a lot in the halogen oven for loads of different things. It's great for containing stuff and stops me flipping wedges over the side of the tray when I want to turn them over !

These were cooked for about 15 mins on the bottom rack at 225deg C.

After that, I popped the top rack in.


Bokwurst went on the top rack at approx 200deg C for about 5 mins or so. These bokwurst weere from Lidls and already cooked - so only need heating through. I like them done long enough that the skins start to split open. Doesn't make them too attractive - but they taste good ! There isn't any fat, water etc comes out of these - they taste as Bockwust should.

The fried onions were the only thing not cooked in the halogen oven


This is a 1kg cheap gammon joint from Lidls. The sort I would normally boil for hours and hours on end.


Remove from plastic and put inside a roasting bag, with a couple of little slits on top. This went on the tray and on top of the bottom rack in my halogen cooker. With it, I put in some hatched baking potatoes. I prefer to hatch (cut) baking potatoes on both sides as they cook much quicker.


This was a while ago. I THINK I cooked it at about 200deg for 1hr 10mins approx in the table top halogen oven. All the juices stayed in the bag - you can see how juicy the meat was. The joint lasted us several days as I used some for sandwiches and later what was left with the reserved juices for a pot of soup.

Enough for now - it's 2am and time for bed ! Hope this helps some of you new halogen oven owners out there.

Happy cooking !

Sarah-Jane Nash - on table top halogen convection ovens http://www.siliconemoulds.com/  - October 2010

Wednesday, 18 August 2010

Piri Piri Lemon Chicken & Halloumi Kebabs with Homemade Flatbread


An easy but tasty dinner tonight.....

I had a pack of Halloumi cheese in the fridge which has been there for ages. Thankfully, halloumi keeps for a very long time. It's quite a salty Greek cheese I belive and lends itself to grilling and barbequing as it does not melt and run - but instead goes crispy.... much like frying tofu I suppose.


I used two chicken thighs per person and cut the meat from the bone into strips. I then threaded cubes of halloumi and the chicken (marinated in a piri piri and lemon marinade) on to wooden skewers. Had I had the ingredients to hand, I would have certainley made my own chilli sauce from either Cherry on a Cake's blog or The Little Teochew's Blog. Both are so much better I'm sure than one could ever get from a supermarket jarred sauce !

Still - the one I used was pretty potent stuff.....

I cooked them on the high rack of my halogen oven cooker on the baking tray (with low grill on top) for approx 10mins at maximum power until cooked through and the halloumi was nicely browned and crispy. No preheating required.

These kebabs would be simply delicious done on the barbeque and are so easy to prepare.

To serve with them, I made some homemade flat breads

Recipe for flat bread

3 cups of plain, all purpose flour
1 cup water
3 tablespoons olive oil
heaped teaspoon black onion (migella) seeds
good shake of powdered garlic
1 tsp ground cumin
teaspoon salt
2 teaspoons baking powder

No need to sieve - bung it all in a bowl and bring it together until a dough is formed.

Split into 6 > 8 pieces and roll them out. I made mine into 8 pieces and rolled them out to approx the diameter of the span of my hand.

Prick all over with a fork and brush tops with a little olive oil

Pre heat a dry frying pan or griddle and cook on each side for approx 3 or 4 mins at a fairly hot heat. You can keep them warm in an oven at low heat under tin foil if cooking a whole batch at once.

How I wish I had a griddle to get those sexy lines on my flat breads... These are very similar to nann bread in look - but more bread like in texture.


I served these simply with some finely sliced cucumber in greek yoghurt with a squeeze of lemon and some cherry tomatoes on the vine.

Wednesday, 7 July 2010

Stuffed Peppers - Halogen Oven Recipe (GUEST RECIPE - HELEN)


This is some photos taken by Helen along with ingredients list for stuffed peppers - cooked in her Sarah-Jane's Halogen Oven / Cooker


large green and red bell peppers
boiled easy-cook rice (2 cups)
chopped up crispy bacon pieces
chopped green spring onion
finely chooped fresh green/red chillies
frozen peas
choped tomatoes
 seasononing
oil/tomato puree or I used 1/2 jar of Doritos Hot Salsa - to bind & flavour.


Remove stalks and stuff peppers. Top with grated cheese


 Helen used one of our 6 cup extra deep muffin moulds to sit the peppers in and stop them falling over during stuffing.

These were cooked in the halogen oven at 160deg C for approx 35 mins. To keep them upright. Helen propped them up with the toast rack. Genius !

Increasing the temperature to 180deg C next time should get them done a bit quicker :-)


On removing from the halogen cooker, they looked like this :


Thanks for the photo and recipe idea Helen. I'm sure those who check in for recipes to use in their Halogen Cooker will appreciate it. Would work nicely in a normal oven too.

Saturday, 12 June 2010

Halogen Oven Bread Post - For ROSIE !


This post is for Rosie, who emailed me yesterday with a question on whether or not it is possible to prove bread in a halogen oven.

For those of you that don't know, a halogen convection oven / cooker is a small table top oven that sits on your kitchen worktop. It has a fan inside and a halogen heating element bulb. They cook solid things like meat joints and potatoes much quicker than a standard fan oven (usually at least twice as fast) and use approximately 1/3 of the power of a standard fan oven. My fan oven is 4500W and the halogen oven is 1200 > 1400W.


You can see a number of things I've made in the halogen oven along with cooking times on our website under Halogen Oven Recipes.

Most oven ready meals cook in half the recommended packet time (often less) using no preheat and using approximately one third of the power which makes a massive energy saving. I do use it a lot for things like that - such as a garlic bread to go with soup / salad / pasta, fish fingers or chicken nuggets for Oliver. The things we all buy now and again when we can't be bothered cooking from scratch.

I now also cook all my roasts in it as not only is it quicker and more energy efficient, but the meat is so much more succulent. Unless you try it, you'll need to take my word on that ! Actully - it's on again doing baked potatoes now...

Many people say you cannot cook bread or pastry in a halogen oven - but this really isn't so. I've had good success with shortcrust pastry, puff pastry and home made bread and rolls.

Anyway - back to proving bread. In the winter time, when my wood burning stove is on, our house is lovely and warm and proving bread is no problem. However, it's not really warm enough indoors at the moment with no heating and it takes forever to rise. Putting it in the halogen oven ensures a warm and draught free place

I normally make bread dough by hand from scratch. However, I'm trialling food mixers at the moment with a view to selling them on http://www.siliconemoulds.com/ next year. For quickness and ease, I used a packet of Wrights Parmesan & Sun Dried Tomato Bread mix and put it in the food mixer to mix and do the hard bit.


It's a 500g packet which makes a good sized loaf.


After removing the dough from the mixer, I kneaded by hand for a few minutes until silky and then put it on the halogen oven baking tray. I covered this loosely with oiled cling film, and put it in the halogen oven to prove. Temperature setting I used was just over half way between the off and thaw setting.

Not enough heat to cook - only enough heat to warm the bowl. The light occasionally came on for a second or two - but very very infrequently.


The dough had at least doubled in size in 30mins. If you wanted to make a more traditional shape loaf rather than free-form like this, use a 2lb loaf tin or the equivalent in a flexible silicone bakeware mould.


I then removed the cling film and turned the temperature up to 200 deg C I think it was (as on the packet for fan oven) and cooked for 20 mins before turning over and doing the base to get it nice and crispy for another 10. In retrospect, I think I would have been better using the extension ring as I did previously and cooking for 25 mins before turning over for 5 mins. Time wise, it took as long as it would have in a fan oven but without preheating and still used 1/2 of the energy. Bread loafs seem to take quite a while - almost as long as oven time though making rolls requires much less than the suggested time.


It made a nice big tasty loaf. I shoved it on a bread board and took it a 20min drive to work where it was demolished warm, in well under 10mins by 3 hungry lads.


Email to packet to tummy in 1.1/2 hours really isn't bad going !

Edited to add a picture of some bread scoffers - Rich from our office and his brother who works next door (and happened to smell the fresh bread !)


Sarah-Jane Nash - The silicone bakeware cook shop - http://www.siliconemoulds.com/

Sunday, 30 May 2010

Garlic Mushrooms - Halogen Convection Oven


ok - so I've gone blogging mad today. Actually - this is about 3 days worth in one.... I simply haven't had time to catch up before now

I've had various people e mail me this week saying I don't post enough about what I cook in my halogen oven. Truth is, I use my halogen oven pretty much every day for something or other. But it's the normal, mundane sort of thing that I don't think twice about doing.

However, there are lots of halogen cooker users out there searching for cooking times and recipe ideas. There are few publications or websites with this sort of stuff online and I'm told our website is coming up quite highly on search engines for the few things I've blogged about.

Therefore - I need to apologise to those who want to see photos of sweet things or baking. I'll put HALOGEN OVEN in the titles so you can choose to ignore !

-------------------------------------------------------------------
Recipe

Remove the stalks from the mushrooms and rub the outsides with olive oil.
Add some chopped herbs and a piece of butter to the middle of each one. I used parsley, garlic, thyme and oregano.


Preheat the oven to 250deg C for a couple of minutes with the bottom rack in. Place your mushrooms on the baking tray onto the rack and place the steamer plate / heat diffuser on top upside down oven the mushrooms
Cook for approx 10 mins until browned and juicy.

Smartie Cakes (cooked in the Halogen Oven)

These pretty little cupcakes were cooked this morning in my Sarah-Jane's Halogen Oven using silicone cup cake / muffin cases. Of course, you could easily use them in an ordinary gas or electric oven. They are safe for use in aga's too.

The thing with halogen ovens is that the body is a round glass bowl. Most traditional muffin moulds don't fit. That's why these little silicone cup cake / muffin cases are ideal for use on top of the baking tray. As you will see from the picture below, paper cases on there own are pretty useless as they cannot support the weight of the cake mix. The silicone cases in comparison hold up well and the cakes come out easily too which is a double bonus !


If you are not familiar with a halogen cooker, it's a table top oven / cooker. It uses halogen technology which basically cooks your food from above using a halogen bulb which shines up like a halo and brings a cheery glow to your kitchen. At the same time, it's also powered by a fan which enables cooknig by convection.

Most conventional fax ovens are 4500W, whereas our halogen ovehttp://www.siliconemoulds.com/1400w-halogen-oven-capacity-incl-accessories-p-181.htmlns use just 1200 > 1400w of power and also cook considerably faster with little or no preheat time. That means you save a whole lot of energy !

The only time I preheat my halogen oven is for baking bread / cakes or things that cook at pretty much warp speed. Even then, 2 > 3 minutes preheat is plenty.

Here's the recipe. They're not overly sweet so aren't over -the- top should you decide to ice them

SMARTIE CAKES

300g self raising flour
1 tsp baking powder
130g caster sugar
80  > 100g smarties
100ml sunflower or vegetable oil
200ml milk
1 tsp vanilla extract
1 beaten egg

sift the flour and mix in the sugar and baking powder into a big bowl

Mix the milk, oil and beaten egg together. I like to warm the milk to blood temperature before using, as I think it makes my cakes rise better

Add the wet to the dry ingredients and mix until just combined. Do not overstir. Add the smarties in the last couple of strokes.

Spoon into muffin cases. These will make 12 standard muffins or 16 if using the silicone muffin / cup cake cases.

IF YOU DON'T WANT TO MAKE THEM ALL AT ONCE, SPLIT THE WET AND DRY INGREDIENTS INTO TWO LOTS AND KEEP SEPARATE. The mixed wet ingredients will keep in the fridge for 2 > 3 days and the dry ingredients will be fine for weeks. You can then make as two separate batches.


Here's my first batch going in the oven.

Preheat halogen convection oven / halogen cooker (1200 > 1400W) to 160deg C with low rack in - or conventional fan oven to 180deg.


These took 13 minutes to cook and came out looking and smelling great. They'll take about 20 mins for a conventional oven.


Hope you all enjoy these as much as Oliver !


Have a lovely weekend

Sarah-Jane (silicone bakeware and blogging fanatic) & Oliver the little cake tester  - http://www.siliconemoulds.com/

Wednesday, 19 May 2010

How to cook a Perfect Soft Boiled Egg (in a Halogen Oven !)


The beautiful eggs pictured above have been laid by my own pretty hens. It's such a pleasure to keep chickens and they are happy to repay us with their eggs. Oliver adores them and they love him too. One particular chicken called Korma follows Oliver everywhere - including into the kitchen if he's been outside and the back door is open !

Really fresh eggs are fantastic. Nothing beats them. Eggs should always be stored and cooked at room temperature, somewhere out of bright sunlight.

We all know that boiling for 3 > 4 minutes should give the perfect soft boiled egg. However, that's not always the case and sometimes shells crack or the middle goes "over" done.

I'm pretty sure I've worked out how to do the perfect boiled egg in my halogen oven / cooker and it's worked faultlessly so far.

Set the temperature on the halogen oven to 125deg C. Put the low rack in and set the timer to 10 minutes. Allow it to heat for 2 mins whilst you go get your eggs.

Remove the top and lay however many eggs you want to cook on the rack. After 8 minutes, they're PERFECTLY done. You'll need 9 mins for a large egg

Leave in for an extra 2 minutes for hard boiled.

Do NOT add any water. This is not required.

I should state - our 1200 > 1400W halogen ovens may cook quicker than less powerful models, so you may need to adjust cooking times if you have a much lower powered unit

Other halogen oven recipes can be found here

Typically - I work this out AFTER I recently bought a new egg boiler. Oh well - that's something else now I no longer need in my kitchen !

Monday, 17 May 2010

Marinated Chicken Thighs & Potato Wedges


There is nothing to this. It's hardly worth blogging !

However, I've had loads of emails recently asking if I cook fancy evening meals. The answer is - only rarely. Generally it's something quick and easy .... unless it's a special occasion or one of us fancies something rather out of the ordinary.

I use my halogen cooker a lot. It's generally used at least an average of 5 days a week. Oliver loves fish fingers and I can cook those in 6 > 7 minutes with a few chips (no preheat) - so my halogen oven is fab for things like that. I can also do fish on the baking tray with steamer plate over the top to diffuse in a similar amount of time. Saves tons of energy and I don't feel guilty about putting the normal oven on to cook just two fish fingers for a toddler and then later again for our evening meal.

For example, tonight I marinated some chicken thighs with garlic and lemon juice and tiny bit of olive oil. I cooked those in the halogen oven at 200deg C for about 15 mins until cooked through. I then decided to make some potato wedges with cracked black pepper and a sprinkle of paprika and popped those in on the top rack for about 10mins. Everything was beautifully browned.


 I could have cooked everything together on the baking tray on the bottom rack. However, if you use a tray on the top rack, the low rack then cooks by convection as it does not get the direct infra-red glow to "speed cook" and takes a good bit longer. I could also have cooked faster if I'd put the wedges on the bottom and chicken on the top rack (letting juices drip onto the wedges - yum yum) as the fan blows the hot air round everything that way.

Truth is, I'd a toddler to bath and get ready for bed and wanted to know our dinner was on the way without rushing bathtime ! That's the thing with the halogen oven - it cooks a lot faster than a normal oven and often faster than I expect. It's also far more energy efficient. The normal oven is 4500W at maximum, whilst the halogen oven is 1400W at maximum. BIG difference - especially with drastically reduced cooking times too. It's much faster cooking for the majority of things and easy to wash up.

Our halogen ovens are arriving back into stock on Friday. I think there are about 800 arriving ! Unlike most retailers, we importantly also stock replacement halogen bulbs for our ovens. Surprisingly few stockists do and a halogen oven with no bulb is pretty useless...
You'll find some recipes on the website here . I promise to try and get round to doing some more - it's just that I forget when I'm using it on such a regular basis !