Showing posts with label birthday cake. Show all posts

Wednesday, 4 June 2014

Tiffany Lamp CAKE - Yes .... This REALLY is a Novelty Cake that looks like a table lamp !

structural and brightly coloured novelty tiffany lamp / table lamp cake

I'm so in love with this cake. The idea of making a cake looking like a Tiffany lamp has been in my head for almost a year.... it's taken me forever to get round to making it as inevitably something always seemed to get in the way that needed my time more. 

Certainly it's lighting me up on an otherwise dull day !


Isn't it pretty ? When finished - it really looked like a proper Tiffany table lamp !

Well - last week I tried out a new madeira cake recipe I found on the net from www.cakesbakesandcoolies.com that allows you to size up a madeira cake from 6" to 12" diameter.

I've copied and pasted their chart onto this page below so I can save it in my own personal ebook, for my own use. Should you wish to use their recipe, you may like to trot along and visit their page and print out the full recipe and instructions.
I baked two x 10" dia madeira cakes. Here you can see I wrapped some strips of damp kitchen tea towel around the outside of the tins and secured with bulldog clips. This helps stop the sides browning too much / getting crusty.
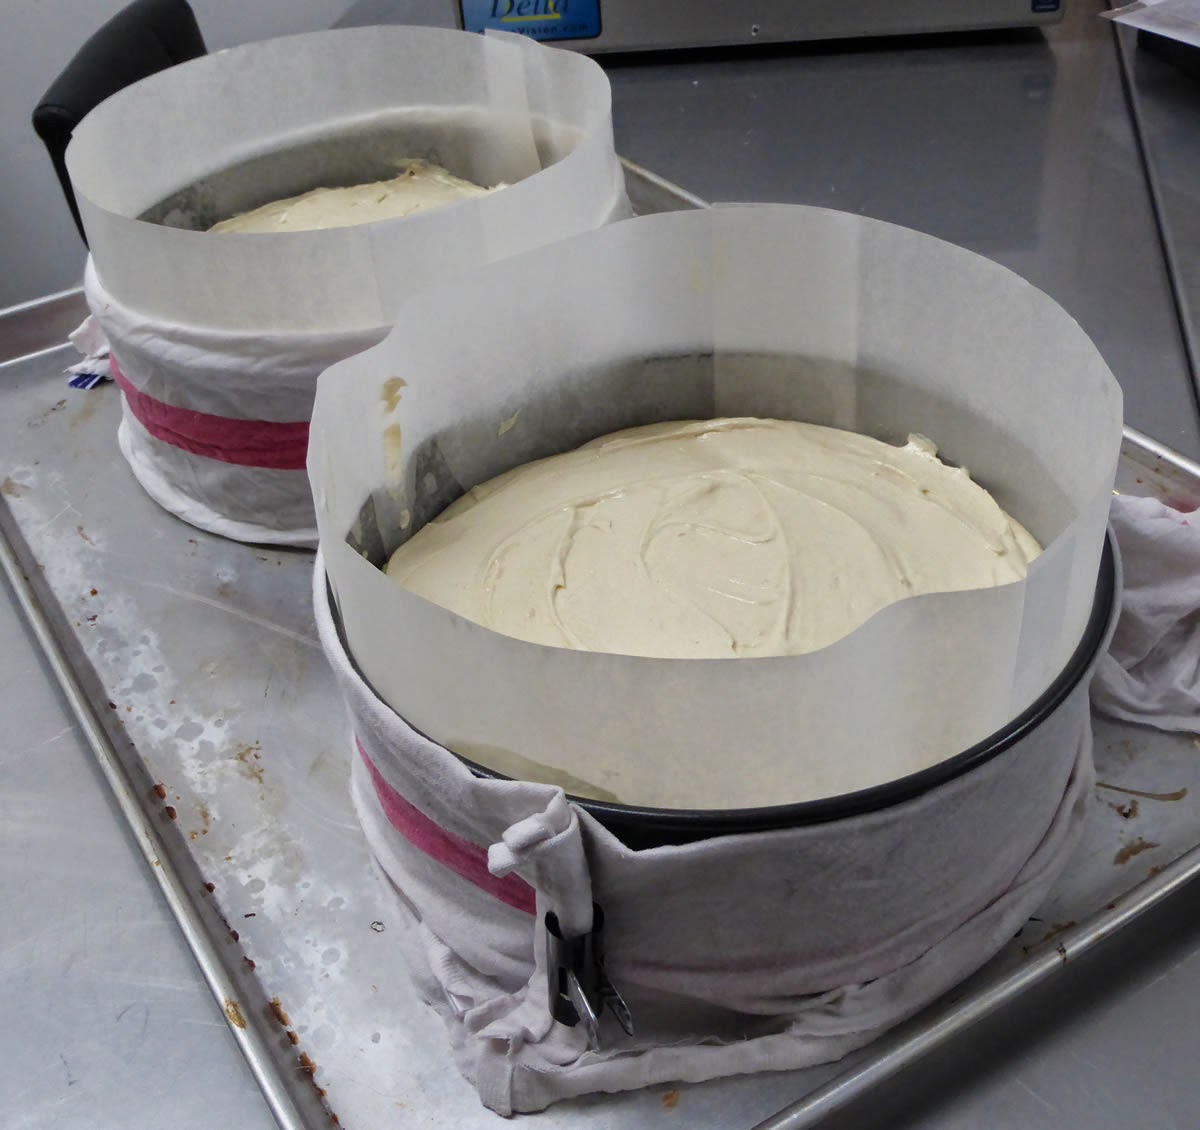

My cakes had a little bit of a dome and a small amount of cracking. I baked at 170deg C - next time, I'll bake lower and for longer...


Cake was very easy to split and had a good even crumb. I usually bake only with butter, but this recipe suggested using 50% stork / 50% butter. I must say, I was skeptical - but the results were very good as was the flavour. 


After trimming, these cakes measured 75mm / 3" high. I cut each cake into 3 layers and filled with buttercream and jam between each one. I them carved the stack into a dome shape before covering in fondant. It's a pretty big cake and on a 16"square board.


Yes - it really IS a cake as you can see in these staged shots. The board is covered in fondant and made to look like wood. The body of the lamp is modelling chocolate around moulded Rice Krispy treats.

I marked on my patterns with a modelling tool before hand painting the "glass" in. Easier said than done ! The leading is modelling chocolate, hand painted with lustre dusts.

MODELLING CHOCOLATE RECIPE

1 bag of Wilton WHITE candy melts (melted)
118g corn syrup - warmed
gel paste colouring (if required)

For black modelling chocolate, add a tablespoon or two of cocoa powder - plus black colouring to the corn syrup. For other colours - omit cocoa

Mix the two together until combined. Transfer into a plastic food bag and allow to sit for a couple of hours to harden up a bit. Knead thoroughly and re-bag. This will be ready for use tomorrow :-)

CLASSES

If anyone is interested in learning how to make this cake, it can be taught as a two day class. A maximum of 6 places would be available. Cost of £225 for the two days, to include cakes and all materials.

Sarah-Jane Nash - www.siliconemoulds.com - June 2014

Monday, 19 May 2014

Land Rover Defender Novelty Cake - Caking With Amy.....


Amy is a keen 15 yo baker, who until recently, has only been playing around with cupcakes. Last month - she came and spent an afternoon with me and made a large fondant covered cake for the first time.

Amy's cherry blossom cake is below. Pretty and a really nice job, especially for a beginner !


Couple of weeks later, Amy asked me if she could come for a day so I could help her make a  Land Rover Defender car cake. Well - to be honest, I'd never attempted a car cake..... so this really was a bit of a challenge...

The cake itself is a dense, chocolate brownie cake (8 x 12" lined tin), cut into layers and filled with chocolate ganache. Very, very rich - but a nice cake to work with and only small servings needed.

330g salted butter
330g dark chocolate
9 tsp instant coffee
250ml water
80g cocoa powder
380g self raising flour
1tsp bicarbonate of soda
720g caster sugar
6 large eggs
50ml vegetable oil
180g buttermilk / greek yogurt

Put the butter, chocolate, coffee and water in a pan and melt together to create a sauce. Set aside to cool.

Put eggs, oil and buttermilk in another bowl and combine. Add these to the cooled sauce.

Sieve all dry ingredients and mix together, then add wet mix and combine until no lumps are visible.

Bake in a preheated oven for 150deg C for 2 hours. 

Once cool, wrap and refrigerate for a few hours or overnight before splitting / carving.


I took a few photos along the way that may be helpful to Amy if she wants to make this cake again (or anyone else who fancies attempting a car cake)

First of all - google BLUE PRINTS and print / make a rough scale drawing of the car required.....

Here, there is a piece of foam core board, cut to shape and scale for the base. The foam core is wrapped in Baco Wrap and this board is on top of the cake drum to make it easier to move and work with.

My 8 x 12" cake was cut into 3 equal rectangles (8 x 4") and stacked. I'd already started shaping it before I thought of taking a photo. Sorry !

The bits cut of the front were kept and used later on as you'll see shortly. The cake was a little smaller than the finished size, as it still had to be coated / sealed in ganache on the outside.


Here is my rough drawing against the cake which is what I used when carving. From the picture below, I then took a slice off to get the angle for the windscreen. I did forget to angle to the roof though, and had to do that once the car was on the board.... before icing the roof. Pay to stand BACK and look !


Here you can see the front has been angled for the windscreen.


All ganched and wheel spacings cut out. Looks a bit like Postman Pat's van at this point....


Cake sat on board to get an idea of positioning. The cake scraps were roughly put in place to sit the front end of the car up - as if it is driving out of a muddy bog.


Cake off cuts ganached and on board - with a wedge to mount / raise up car.


Cake board front covered in fondant. I painted piping gel over this and covered with desiccated coconut which I'd coloured green and dried in the oven. 


The back part of the board got covered a little later in brown coloured fondant.


Side panel made out of modelling chocolate applied. There is a little strip of modelling chocolate under this along the centre line of the car to be able to dress the outer panel over and add shape.

The excess fondant for the windows was removed a little later.


A few more panels added, it's taking shape !

At this point, I then put the cake on the board and secured using a little piping gel to the fondant on the base. The front of the car roof underwent a little carving work to reshape as I noticed the error mentioned earlier.... then lights etc were added.

Hope this proves useful ! 

I certainly learnt a lot from it and know areas / ways to improve on for next time.

Sarah-Jane Nash, www.siliconemoulds.com - May 2014

Monday, 4 November 2013

Oliver's 5th Birthday Skull Cakes with Gore and Dry Ice !


Happy Birthday Oliver !

I can't believe you are 5 years old already. The last year has been such a blur - but so full of fun ! Was it really a year ago we made that gingerbread pirate ship ?

Hope you enjoyed this year's birthday fun. Soon be time to start thinking about what cake you want when you turn 6 ! Love you loads little man. Mummy xxxx


For Oliver's birthday this year (25th of November, 2013), we had two cakes. One for his party and the other for the day of his birthday - which just happened to be a school day.

After all - you can't have a birthday if you don't have a cake I'm told. That's why Mummy gets to be 38 for another year :-)

The cake above and directly below is cake number 2 - the party cake. 

The small skull was made of white chocolate using the Wilton 3D Dimensons Mini Skull Pan. The top tier cake was red inside and the bottom tier was bright green. Vivid - but just a simple lemon cake with lemon buttercream. The spider web effect is hand painted with lustre dusts.

We had some super awesome fun at the play centre with some dry ice. Watch the kid's expressions in the video. Oliver is still talking about it....


It's ok - it's not REAL smoke....


Happy (tired) boy having a cuddle with Daddy.


Spooky juice anyone ?


----------------------------------------------------

Here is the other birthday cake. Oliver got to take it to school !

You will no doubt recognize the life size chocolate skull as I made one last month and blogged about it. Also - the recipe for the marshmallow eyeballs is here. Put them together ..... with some marshmallow krispy treats and strawberry ice cream sauce..... and it makes one heck of a mess when you smash it up !


Oliver and Mrs Newberry cutting the cake.


Yikes - that's a bit scary inside Mummy !


Even after eating marshmallow krispy brains dipped in strawberry blood along with eyeballs - the kids still had room for some cake !


Racing around on the playing field after school with Alfie.


Sarah-Jane Nash - Mummy to Oliver age 5 ! - www.siliconemoulds.com - Nov 2013

Friday, 5 October 2012

Base Madeira / Layer Cake Recipe and Working Late...


I've made a few birthday cakes recently - two in the last week. It's a great excuse to practise some new techniques and practice skills, especially since I don't make larger cakes very often. I've taken to using this recipe for layer cakes. It's dense and holds up well and makes a good slicing piece. It's not going to crumble into a billion crumbs when you cut it.

This Scotty dog cake was made in our new silicone large Scotty dog cake mould (we also do a matching small version for making chocolates). I made up a chocolate recipe batch as original intention was to frost in chocolate buttercream. I used one batch of mix - but to be honest, I should have added another half batch (6 eggs rather than 4) and made it a bit deeper. Always next time !


At the last minute, I changed my mind. It ended up split and filled with raspberry jam and vanilla buttercream and I frosted it in more pink vanilla buttercream with a star tip. I gave the cake a very light covering of the buttercream before piping the rest on with a star tip.

The ribbon originally came from the odds and ends basket at the local haberdashery and had been in my ribbons box for some time. It just worked brilliantly as a collar and I used two brown Smarties (chocolate beans) for the eye and nose. 


RECIPE

300g self raising flour
300g caster sugar
4 large eggs (room temperature)
250g of salted butter (soft - but not melted)
60 to 80ml of milk
2 tsp vanilla extract

Sift flour and sugar together into mixer bowl. Add eggs, milk and vanilla and mix until smooth. Add blobs of the butter and keep beating until all incorporated.

Put into a greased and floured silicone bakeware mould or tin (alternatively use cake release spray) and bake until done and a cocktail stick comes out clean. In an 8" / 200mm dia tin, this takes approx 70mins. It may take less in a bigger mould / tin or longer if you increase the quantity of mix to suit your mould or tin.

bake at 160deg C if using a fan assisted oven.

For the chocolate version, reduce the flour to 240g and add 80g of good quality cocoa powder. A little more milk will be required.


This is the other cake I made this week. Peppa Pig with her teddy - for Amelia's birthday. The bottom tier was two lots of mix cooked in 8" tins and made into a 4 layer cake (with tops removed after levelling). The top tier was one batch split between two 6" tins and made into three layers. It's on it's own board and the bottom tier is dowelled to support it.


---------------------------------------

I had a couple of late nights at work making these. One night on my own. The second, Martin came in with two of his kids who baked some cupcakes whilst I iced the Scotty dog for their little sister, who's birthday was on Saturday. 

I don't really like being in there on my own late at night. It's a big old warehouse which used to be an American Air Base during the war with the kitchen (as yet unfinished at the top). There is a lot of noise at night. Weird creaks and groans and rattles. Mainly from the roof and the electricity metre - but it does still freak me out !

We know the estate is hunted. Some years ago, my husband saw a ghost in his unit, and Martin (my colleague) has had a ghost (man) walk right past him in the adjoining unit. I'll let him tell you about that sometime. Needless to say, I get creeped out working in there late and had to finish Amelia's cake on the second night as I just couldn't bear to stay in there longer in the dead of night on my own .....

Thursday, 6 October 2011

Almond & Cream Bundt Cake


Well - if you want a really good basic cake recipe to use for birthday cakes / cakes for special occasions - or even just something plain and simple. I guess this has to be it. 

This cake has a fine but dense crumb and cuts beautifully. It would make a super cake for carving.

This is the second time I've made it - this time in our new heart shaped bundt / tube pan. I have not dusted it with icing sugar - nor glazed it. This way, you can see absolutely all the details and it's impossible to hide any flaws ! To be honest, the cake does not need it. It's delicious as is, but adding a glaze when warm and letting it seep really makes it truly something special

Ingredients

  • some slivers of almonds
  • 2.3/4 cups of flour
  • 1/4 cup of corn flour
  • 1/2 teaspoon salt
  • 1/4 teaspoon baking soda
  • 225g salted butter
  • 3 cups white sugar
  • 6 eggs
  • 2 teaspoon vanilla (or almond) extract
  • 1 cup double cream, with a good squeeze of lemon to sour

Preheat oven to 150deg C.

Take your bundt / tube ring pan - (I used our new silicone heart bundt bakeware mould) and lightly butter the inside. Dust with flour and tap out any excess over the sink.

Cream the butter and sugar together until pale and fluffy. Add one egg at a time, beating in well. After each egg, beat in a tablespoon or so of sieved flour to prevent the mixture curdling.

Once half the remaining sieved flour has been added, add the cream and flavouring extract, followed by the rest of the flour until just combined but no flour remains visible.


I put some slivers of almonds in the base of each heart shape so that these would show on the top.


Bake at 150deg C for approx 80mins until a toothpick comes out clean. As you can see, the mix did not QUITE fill to the top of this silicone mould.


As the silicone is very flexible, it was no problem to roll down the top of the mould once the cake had cooled.
I inserted cocktail sticks into the cake at the same height every 3inches or so right round the outside. I could then use these as a guide to cut the top part of the cake off with a serrated knife..... taking care not to cut the centre piece in the middle.

This off-cut was enough to serve 6 people in it's own right - it's a pretty big cake !


This is what it looked like after I cut the domed top part off, using the cocktail sticks as a guide. Perfect way to get a level cake !

Invert on to a serving plate and it's done.

If you want to glaze, try making a paste with orange or lemon juice and some icing sugar. Pour on the top whilst still hot and allow it to soak in. If the cake has cooled, you can always heat the orange / lemon juice and icing sugar until liquid and pour over the top as a syrup.

Sarah-Jane Nash (cheating - I made this in August !) - October 2011 - www.siliconemoulds.com

Sunday, 7 August 2011

Roll Up, Roll Up - It's Swiss Roll Time :-)


Swiss Rolls were on my baking bucket list. They've been there for a considerable amount of time. Many other things get added.... and scored off... but swiss rolls remained.

Ok - I can bake. Like anyone, I have the occasional kitchen disaster - but few things are inedible even if they don't look that pretty. I don't know what held me back so much from attempting swiss rolls. The fear of cracking it I suppose. A crack should not be the end of the world though. That bit is simply cosmetic.

Those that really know me however will know that I don't take failure lightly. I LIKE good results and I like visions to be realised. I guess lack of time to make the same thing 20 times and get that result was what was holding me back.

Recently, Ann Low of Anncoo Journal has made some terrific looking swiss rolls and it really inspired me to have a go.


I've adapted Ann's recipe to fit our new Tray Bake / Swiss Roll Silicone bakeware mould. we've had this  mould in for a month or so, but I had not got round to using it. Ann uses a bigger square tray. I tried everywhere, to get a big square tin tray like Ann's - but failed miserably. They don't seem to exist in the UK. I wanted to make my swiss rolls look like Ann's....

Anyway. This roll is a really good size. I start at the narrow end and roll down the length. This mould is just under 11 x 9" inside and a more common size for tray bakes or swiss rolls in the UK.

RECIPE

note - digital scales required !

55g plain flour
15g icing sugar
25ml oil (vegetable or sunflower are fine)
25ml water
3 egg yolks
1tsp of vanilla or almond extract

3 egg whites
40g icing sugar

Preheat the oven to 160deg C

Line the base of the silicone mould with some baking paper and oil the surface of the paper. You need this to lift it easily out of the mould for rolling.

Mix the first set of ingredients together.

Whip the egg whites in a separate bowl to soft peaks. Add the 40g of sifted icing sugar and continue to whisk to stiff peaks.


If you want to make a pretty pattern like Ann's Swiss rolls, take a couple of teaspoons of each mix. Put them in a cup and mix together with some food colouring. 


This can be put in a piping bag and piped directly on to the baking paper lined tray.


Ann's blog tells you to PUT THIS IN THE OVEN for a minute or two to set it. Stupid me didn't read that bit and smudged it up when I made my stripey roll... The second roll I made, Oliver helped. Instead of nicely spaced spots we ended up with pink splats. Hey - it tasted just great anyway !

Fold the rest of the egg white mix and egg yolk mix together


Carefully put the plain mix on top of your design...


Bake in 160deg C oven for approx 15 minutes


Remove from oven. Allow to cool.

Remove from mould and invert on to a plastic sheet on top of a towel. I skipped that and used a silicone baking tray liner. Carefully peel away baking paper. Turn back over and trim the edges off the short ends at a 45 deg angle, then spread the cake with a layer of good quality jam (I used cherry).


Start to roll up the cake from one of the short ends.

I rolled mine up and then kept going to roll the mat right round the outside of the rolled cake. This photo shows my roll inside my silicone baking tray liner.


Put in the fridge for an hour or so. This helps it hold and not unroll like a spring when you unwrap it !


As you can see, my first attempt looked like an edible paint roller ! So maybe diagonal stripes isn't the best choice of pattern. lol


The lines were a little out of true though as I didn't read to bake for a minute or two to set the stripes before adding the rest of the mix. I thought my second attempt would turn out really pretty - but it turned into splat markings with a little help from Oliver !

We've been out most of the day today. It was Emma's 4th birthday party. Emma is Oliver's best buddy and her mummy is a very very good friend of mine :-)


Victoria has been busy baking too this week - making loads of cupcakes with Emma for the party and also the kitkat cake I posted a week or two ago. Happy Birthday Emma !


Sarah-Jane Nash, August 2011 - www.siliconemoulds.com