Showing posts with label 2lb loaf tin. Show all posts

Tuesday, 21 December 2010

Upside Down Banana Pudding - a warm and sticky treat !


Well - I'll admit I'm cheating a bit here. It's a few weeks since I made this - but then again, I have been terribly behind in blogging !

Pudding is something I rarely make. However, sometimes when it's cold and dark outside it's quite comforting to make and devour a good old fashioned English pud. It's sweet and syrupy. The hot bananas are lovely and the little alcohol hit from the plump sultanas was nice but not overpowering.

This recipe originates from OLIVE magazine last year and is posted on the BBC Good Food Website here.


Apologies for the photos - they really are not good. The lighting was dismal and everyone was waiting to eat it - including Oliver who was bouncing up and down like a puppy on a lead whilst yelping "Pudding, pudding, pudding!"

It was all I could do to keep the fabric on the kitchen side as he was so keen to get to this .... It's a miracle that somehow it did not land on the floor !

Ingredients

100g of sultanas
50ml of brandy or rum
5 large bananas
75g softened butter
100g caster sugar
1 egg
1tsp vanilla
175g self raising flour
60g of pecans*
1/2 tsp nutmeg*
1 tsp cinnamon*
8 tbsp golden syrup

I ommitted the nuts and upped the sultanas only because I didn't have any and the nutmeg and cinnamon were my own additions

Soak the sultanas in rum for 30mins. Actually, I used home made apple brandy and soaked them over night in more like 75ml.

Heat the oven to 160deg C or 140deg C if fan oven

Line a 2lb loaf tin with baking paper. I actually used a 2lb silicone loaf mould. I did line the base with a strip of baking paper incase it needed a bit of help with all the golden syrup and bananas at the bottom. (Next time I really wouldn't worry as the bananas were nicely bedded into the sponge part and the syrupy stuff) just runs out.

Next, put in the golden syrup.


Slice two of the bananas lengthway and then cut in half across the middle. Lay the slices into the loaf tin or 2lb silicone loaf mould / mold. The bananas want to be face down and these will eventually become the top of your pudding.


Cream butter and sugar. Add egg and combine followed by vanilla, spices, flour and remaining bananas (mashed). Stir in the sultanas and then put the batter on top of the bananas


Bake for approx 50mins. Remove from oven and leave to stand for a few minutes before turning out.


Serve hot, as you like - with cream, ice cream or custard.

Not any good reheated on day two - so the chickens finished it. It's quite a good sized pud - easily serves six people.

Sarah-Jane Nash, December 2010 - siliconemoulds.com - the silicone bakeware specialist cook shop

Saturday, 14 August 2010

Psychedelic Creamed Coconut Cake


Ok - so this is TOTALLY off the wall and rather freaky to say the least.....

However, underneath that brain haemorrage of colour a basic creamed coconut sponge is within.

Oliver (my little 22month old son) has been plonking himself daily in front of the oven in the kitchen. With his big doughy and soulful eyes he'll blurt out "Please Mummy - cake please Mummy !"

It's got to be a couple of weeks since I last made cake. I've got so little time at the moment and my waistline really does NOT want cake. Most of the time, Oliver isn't overly fussed with cake and rarely has more than a few bites. The little mite has been getting more and more demanding for cake this week .... and I could resist no longer.

To make it a little more intersting for Oliver, I had a play with some gel food colouring.


Oliver stood on his soap box bucket next to me in the kitchen. Yes - I still have buckets of melt and pour soap base in the kitchen as I've got soap making to do too and haven't had time for that either. Still - the bucket made a perfect stool !

After making the cake batter, I divided it into 5 different bowls and coloured them shocking colours with the Wilton gel icing colours. Oliver was very amused by this - he knows most of his colours now and there were some serious shreiks and noises as the cake mix turned vivid shades of blue, yellow, red, green and purple.

I poured the mix one bowl at a time into a 2lb silicone loaf pan / tin mould which had been lightly greased and floured. It then baked in the oven for 45 mins.


This is what came out. I'd kept the bright yellow mix until last - hoping that it would make the cake look normal, but as it rose the colours had also expanded and broken through to give it a horrific bleeding skull look :-S

After cooling, I sliced it some time later. The mix turned out thinner than I would have liked. Had it been a stiffer batter I dont think the colours would have swirled into each other so much - but it would still have looked seriously freaky I'm sure !


All I can say is that despite the colour, it didn't put Oliver off ! He happily sat in his high chair munching his cake mumbling "Mmmm cake yummy Mummy" in between mouthfuls !

I put the rest on a large plate to take into work this morning. The wood burning stove side of the business is really busy this time of the year. I tend to take cake in with me (as well as Oliver) on most Saturdays during our busy season and usually people are only too happy to gobble it up. Many often ask for the recipes too.


The only "taker" on this cake today was Oliver. I think most people took one look and it scared them for life ! The rest is now away with my husband on a camping trip tonight where I'm sure he and his friends will gobble it up in the dark with a coffee when they don't need sunglasses to look at it.

Seriously - the cake WAS really tasty - it just looks odd and inedible .... hahaha.

Recipe

200g caster sugar
180mls sunflower oil
200g plain flour flour
2.1/2 tsp baking powder
4 eggs
125g creamed coconut 

Sieve dry ingredients and add wet. Mix with an electric whisk until smooth batter forms.

If you've lost your marbles and want to make a crazy looking cake no one except toddlers will want to eat - you can now split your mix into bowls and colour with gel colouring. I cannot imagine what someone would think finding a surprise piece of this cake in their lunch box. hehehe

Pour into a greased and floured 2lb loaf tin or mould and bake at 180deg C for about 40 > 45 mins until cake tester comes out clean.

Sarah-Jane Nash - silicone bakeware moulds, cook shop http://www.siliconemoulds.com/ August 2010

Saturday, 12 June 2010

Halogen Oven Bread Post - For ROSIE !


This post is for Rosie, who emailed me yesterday with a question on whether or not it is possible to prove bread in a halogen oven.

For those of you that don't know, a halogen convection oven / cooker is a small table top oven that sits on your kitchen worktop. It has a fan inside and a halogen heating element bulb. They cook solid things like meat joints and potatoes much quicker than a standard fan oven (usually at least twice as fast) and use approximately 1/3 of the power of a standard fan oven. My fan oven is 4500W and the halogen oven is 1200 > 1400W.


You can see a number of things I've made in the halogen oven along with cooking times on our website under Halogen Oven Recipes.

Most oven ready meals cook in half the recommended packet time (often less) using no preheat and using approximately one third of the power which makes a massive energy saving. I do use it a lot for things like that - such as a garlic bread to go with soup / salad / pasta, fish fingers or chicken nuggets for Oliver. The things we all buy now and again when we can't be bothered cooking from scratch.

I now also cook all my roasts in it as not only is it quicker and more energy efficient, but the meat is so much more succulent. Unless you try it, you'll need to take my word on that ! Actully - it's on again doing baked potatoes now...

Many people say you cannot cook bread or pastry in a halogen oven - but this really isn't so. I've had good success with shortcrust pastry, puff pastry and home made bread and rolls.

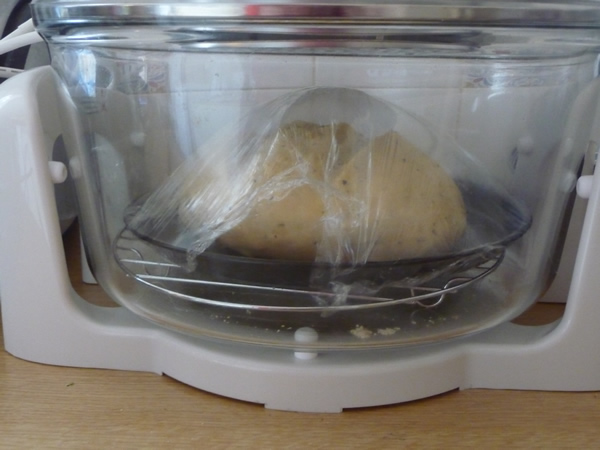
Anyway - back to proving bread. In the winter time, when my wood burning stove is on, our house is lovely and warm and proving bread is no problem. However, it's not really warm enough indoors at the moment with no heating and it takes forever to rise. Putting it in the halogen oven ensures a warm and draught free place

I normally make bread dough by hand from scratch. However, I'm trialling food mixers at the moment with a view to selling them on http://www.siliconemoulds.com/ next year. For quickness and ease, I used a packet of Wrights Parmesan & Sun Dried Tomato Bread mix and put it in the food mixer to mix and do the hard bit.


It's a 500g packet which makes a good sized loaf.


After removing the dough from the mixer, I kneaded by hand for a few minutes until silky and then put it on the halogen oven baking tray. I covered this loosely with oiled cling film, and put it in the halogen oven to prove. Temperature setting I used was just over half way between the off and thaw setting.

Not enough heat to cook - only enough heat to warm the bowl. The light occasionally came on for a second or two - but very very infrequently.


The dough had at least doubled in size in 30mins. If you wanted to make a more traditional shape loaf rather than free-form like this, use a 2lb loaf tin or the equivalent in a flexible silicone bakeware mould.


I then removed the cling film and turned the temperature up to 200 deg C I think it was (as on the packet for fan oven) and cooked for 20 mins before turning over and doing the base to get it nice and crispy for another 10. In retrospect, I think I would have been better using the extension ring as I did previously and cooking for 25 mins before turning over for 5 mins. Time wise, it took as long as it would have in a fan oven but without preheating and still used 1/2 of the energy. Bread loafs seem to take quite a while - almost as long as oven time though making rolls requires much less than the suggested time.


It made a nice big tasty loaf. I shoved it on a bread board and took it a 20min drive to work where it was demolished warm, in well under 10mins by 3 hungry lads.


Email to packet to tummy in 1.1/2 hours really isn't bad going !

Edited to add a picture of some bread scoffers - Rich from our office and his brother who works next door (and happened to smell the fresh bread !)


Sarah-Jane Nash - The silicone bakeware cook shop - http://www.siliconemoulds.com/

Sunday, 11 April 2010

Lemon Drizzle Cake


I always think that lemon drizzle cake tastes like summer on a plate. I love the sharp lemony zing :-)

The recipe below will make a tea loaf in a 2lb silicone loaf mould or 5 x mini loaf size cakes . With a traditional non-stick tin, you are advised to line the bottom of this with paper and grease the sides. Same goes for silicone as after adding the sugary syrup bit it gets very moist and may stick a bit to the bottom. I took them out the moulds hot, drizzled the syrup on and then popped them back in to cool off... but to make removal after adding the syrup adding bit easier, I'll do the paper on the bottom bit next time.

175g self raising flour
175g butter (or margarine)
2 large eggs
60ml milk
175g caster sugar
zest of 1 or 2 lemons

For the syrup :

juice of 2 lemons
4 table spoons granulated sugar

Cream butter and caster sugar until pale and fluffy. Add lemon zest and beat in eggs one at a time. Sift in flour - beating only until combined. Add milk and combine.

Put into a greased non stick 2lb loaf tin or silicone bakeware mould for one large cake - or 5 mini loaf silicone moulds.The base/s should be lined with baking parchment or greaseproof paper.

Bate at 180deg C in a fan over for 55 mins or until done. For mini loaf moulds, these take about 18mins.


For the syrup....

Place the lemon juice in a small pan and reduce to half. Add the sugar and boil until sugar is dissolved.

When cake / cakes are hot and just out the oven, prick the cake over the top with a skewer and pour on syrup. Allow to cool before serving